Although this pattern is modeled as a short swimsuit cover-up in the newest supplement I knew I would lengthen it to wear as a lightweight blouse for a cool Summer top layer. The pants in the right picture are also from supp. #305. You can read that review here.
Pattern Drafting Hints:
The basic shape of this pattern is loosely fitted from the shoulders to the bottom of the armsceye and then flares gracefully to the bottom. Because of the very loose shape, and to save time, I decided to draw the whole pattern using my high bust measurement to fit the shoulders. The contrast bands on my topper are achieved by cutting the pattern apart at the facing lines. I'll detail this further in the design changes below.
Fabric Used/Suggested:
My version of the pattern is made up in a black and white, rose print, polyester chiffon. The contrast bands are interfaced with a knit interfacing for a little extra weight and stability. Realistically this pattern could be made up in almost any fabric that has enough drape to keep it from standing away from the body. I can imagine this garment in lace, gauze, burnout velvet, knit or even loosely woven rayon or cotton. If your fabric choice is not terribly drapey you might consider adding some weight to the hem with a beaded or ruffled trim.
Design Changes:
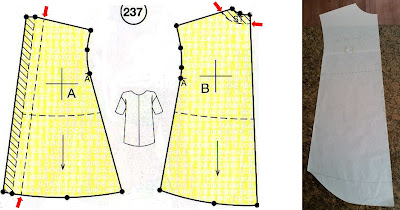
The first design change was to lengthen the entire pattern, front, back and sleeves, by four inches at the cross mark, per the Lutterloh instructions. As I mentioned above, my next design change was to convert the facings into a contrast band. The photo below, on the left, has arrows that point to where I cut the facings from the main pattern.
The photo on the right shows an additional four inches that I added to the back by reshaping the hem to form a more exaggerated shirttail shape. The contrast band on the sleeves is just a three inch wide band, folded, and attached to the sleeve hem. Although it's not indicated on the diagram, I cut my back pattern on the fold because I didn't want the seam to interrupt the lovely floral pattern of my chiffon.
Closing Hints:
In sheer chiffon this might not make a very effective swimsuit cover but I love it as a breezy Summer top layer! I do prefer this in the longer length for me. My first paper fitting revealed that the pattern would hit right at crotch level just as shown on the model. In any length you prefer I would wholeheartedly recommend this pattern!
With Summer coming to a close I'd like to remind you that the Autumn supplement #306 is now available for preview. It usually shows up for preview first on the German Lutterloh site here: https://lutterloh-system.de/produkt-kategorie/archiv/
We appreciate your comments and are happy to answer any questions you have about this wonderful pattern system. Happy sewing everyone!
Ann in Calif.
We appreciate your comments and are happy to answer any questions you have about this wonderful pattern system. Happy sewing everyone!
Ann in Calif.


