Tuesday, April 14, 2009
What to do if the size is a small child

I have many old Lutterloh books from all over the world. The fashions are breath taking, the history is loud and clear. There is a new baby in our family, a grand daughter and her mom wanted a special dress for her church ceremony. I took out my books and found this sweet little dress. The book it is in came from Brazil so I can't read the pre-directions in the front. he he!

#107
The only problem I found is Penny is only a tiny thing and she measures 46 on the Lutterloh ruler. If you look you will see there isn't a 46, the smallest it goes is to 50. If I use 50 that will make this dress TOO BIG. You may run into this one day and so here is what I did.
1) Put the holding pin in the bottom most hole and put it through the X in your pattern
I used pattern #107 below. Lets make the skirt

2) Make a second ruler top by printing a copy of yours on card stock.
You will use this to remove the extra.
3) Do a little math on the newly printed ruler. Penny's pattern will be too large by three spaces 46 to 50 on the ruler count to the 4Th line to get the three spaces. A sticky page marker put on the spot helps. Or just work from a number close to yours I used 66 and put a marker and went to 60 on the card stock tape top.
4) I put my pin in at 50 and Penny needs her pattern made at 46. The first number on the skirt pattern is #23 at the top waist. I pull my tape out and find #23 on my original tape then I lay my printed card stock tape top on the #23 line and measure off my three spaces. I made my mark there. Don't be tempted to just add on the original tape measure because it won't be correct. It is slightly different. Be sure you put your Dot on the correct side of the tape, the side that lines up with the Number #23 line at the pattern.
We are subtracting the three spaces for the correct size.
I have two tapes the green shows the 23 the pattern showed the orange tapes show the amount I must remove. Yes remove. so I put my dot at the top orange mark, 3 spaces above the bottom orange tape.
Once you do the math this goes just as fast as any pattern would and I got a perfect size pattern. I always lay the pieces out and measure to be sure I have the kind of ease I would want in a pattern.
Penny is a baby and everyone will be picking her up and down so I wanted to be sure there was room for her comfort. She measures 17" in her chest and the pattern made 22". That is 5 inches of ease and that will be plenty and work with that full skirt.

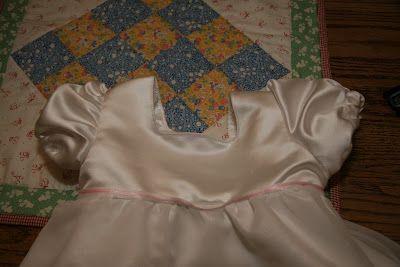
This is the finished dress. My daughter in law wanted the dress shorter, only to the babies feet and she had the idea for adding the ribbon. I can't wait to show her my Lutterloh baby dress! I think I would have removed an inch of the ease now that I see it on her but I was far away when I made this dress and could only guess by using the measurements.


Wow Fonelle, Absolutely beautiful. You are so motivating. I haven't touched my Lutterloh since before Christmas and I must get back to it. I have a new great-grand-daughter, born January 3rd.
ReplyDeleteI have some patterns and have not yet tried them. I am anxious to get started. I would love to join you all. I can be the "sewing Canadian"
ReplyDeleteJust gorgeous Fonnell.
ReplyDeletedo you know how i can make the ruler without purchasing it? I emailed a company and they told me $30 for the toolset.
ReplyDeleteI got the LL system at a thrift store for $6 so I dont really wanna pay $30 for the ruler.
Please msg me on my page :)
http://sewingnhumming.blogspot.com/2009/07/making-pattern.html
ReplyDeleteIn this posting you will see how easier it is to do curves without a plastic ruler. I like a really good yard stick and do most everything with that and the swirl of my pencil. Your daughter is sure beautiful!
thank you for sharing this tutorial!! Huge help in getting me to visualize how I can utilize these patterns for my babe =) Now if I could just get my hands on some of those vintage patterns
ReplyDeleteI just started using lutterloh this year. I am very exited to see your blog. Wow! So much work to bring this to us. I love it. Made two sun dresses. So many compliments on them. Strangers even asked where I got them. You put the icing on the cake for me by sharing your expertise. I have made so many notes and posted them in my sewing room.
ReplyDeleteThank you for your kind comments, that's just wonderful. Can you send us some photos we can share?
ReplyDeleteI have just found your blog, hope it is still current, I have a couple of pattern books from the 50s to early 60s but the styles are quite elegant and may be wearable now, certainly with the tweaking you encourage.
ReplyDeleteThanks