Friday, December 1, 2023

Some Lutterloh Gifts

 Children's Collection 3
Special Edition 39 
Pajamas and nightshirt for my son's niece

    Hello again Lutterloh enthusiasts. I thought I would get a jump on some sewing for the holidays. Sewing for children can be so rewarding and Lutterloh makes it easier with their customizable sizing. 
 
Pattern Hints:    
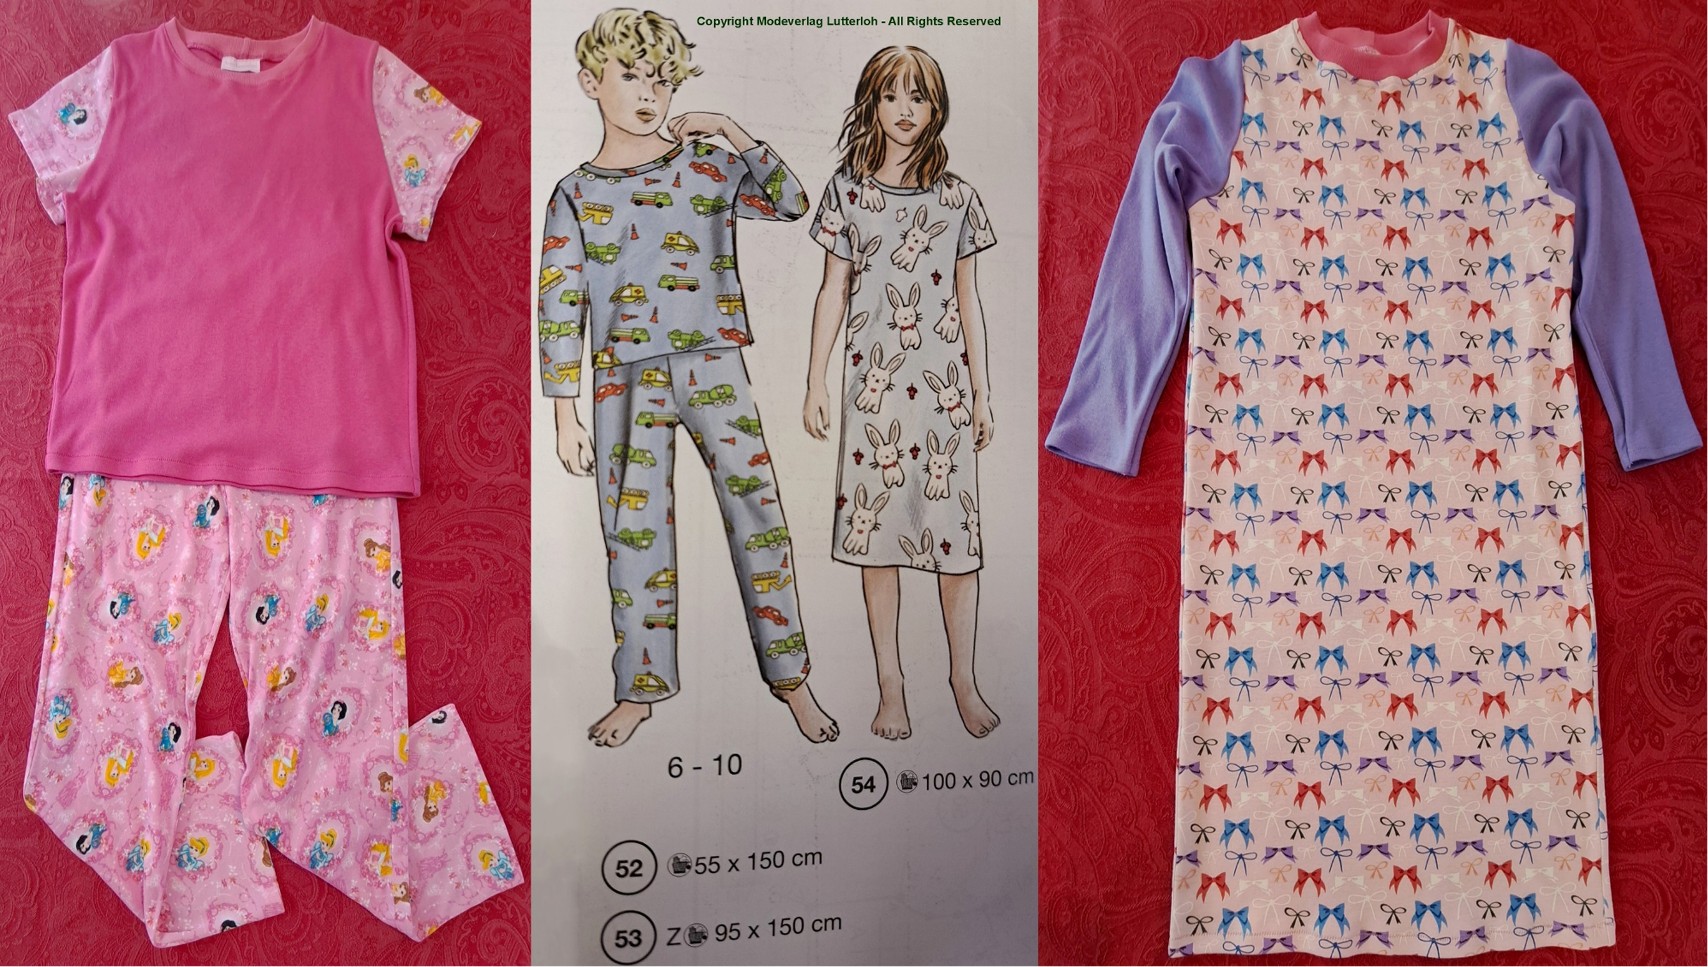
     This pattern is from the most recent Special Edition for children but it also appears in Supplement #319 from 2020. Unlike many recent Lutterloh patterns the neckline on this pattern is not actually as wide as the drawing makes it look. I made the nightshirt first and decided to make the ribbed neck binding a little longer for the pajamas. 
 
Design Changes:
    Since the sleeves are interchangeable for these patterns I ended up with long sleeves on the nightshirt and shorter ones on the pajamas. This had more to do with a shortage of fabric than any real design decision. I was just trying to make the items look cohesive with the fabric that I had on hand. 
 
Fabric Used/Suggested:
    As the symbol indicates this pattern is intended for knit or stretch fabric. The nightshirt is a lovely cotton interlock from Fabric Worm and the pajamas are made from a mystery fabric from a rummage sale. One of the nice aspects of sewing children's clothes is that it doesn't take much fabric. I still didn't have quite enough thus the contrasting sleeves. 
 
Closing Hints:
    Somehow I thought I was getting a head start to my holiday sewing but there is just so much more to do! At least kids pajamas are a fast project and ultimately satisfying because they always turn out so cute. 
 
Here's hoping you get all your holiday sewing done in time. I sure hope I do anyway.
 
Happy sewing everyone,
Ann in Calif.

Sunday, October 29, 2023

Lutterloh Patterns Come Alive!

 Supplement 330 - Model#161
 Knit dress with short, kimono sleeves and side slits
 
    Hi there folks. It seems like Thanksgiving is right around the corner and I thought I should make a dress that won't have me roasting in the hot kitchen along with the turkey. This cap sleeved, knit dress looked like just the ticket. The high, round neckline is not the most flattering for me so I changed it to a draped, cowl neckline. 

Pattern Hints:  
    This pattern was a breeze to enlarge to my size. It is rather long though so make sure you have a nice long table to work on. The short sleeved view of this pattern is comprised of just two pattern pieces, front and back with neck facings from the same pattern pieces. The self belt is a suggested length rectangle. I was surprised to find that despite the apparent shaping at the waist this dress really does turn out as shapeless as the line drawing for the back suggests.

Design Changes:  
    The one major design change I made was to convert this pattern to a draped, cowl neckline. I used the instructions outlined in this article by Threads magazine. Since my figure is curvier than the model pictured I knew I would skip the self belt worn at the hips. I also had to cut my pattern at the waist and make separate bodice and skirt pieces. Besides making it easier to adjust for the cowl neckline it also made it possible to cut this altered pattern out of just 1.75 yards of 58 inch wide fabric. Since my belt sits at the waist it completely hides the seam there.
 
Fabric Used/Suggested:
    This pattern is designed for a knit fabric and without a closure of some kind that's exactly the type of fabric needed to get the dress over your head and shoulders. My fabric is a lovely, soft cotton print from Fabric Worm with 5% Lycra added. I was fortunate enough to have stopped by their retail store in Paso Robles, CA on a trip to see a friend in Ventura, CA. I'm sure this simple pattern would lend itself to many different knit fabrics. I may change the neckline to a "V" shape to use up some sweater knit.
 
Closing Hints:
    The longer length with high side slits on this dress makes it feel just a little fancier than a standard T-shirt type dress. The top of the slits, at the suggested 30cm, hit a little above the knee on me. I am finding I prefer the shorter, kimono type sleeve to a separate set in style. I feel like it gives me just a little more room at the bust when making an otherwise close fitting bodice. Now that I have this altered for a cowl neck I will likely use the pattern at the shorter, top length for #162 to make a shell for under jackets. Cooler weather is upon us.
 
Make sure to take some time for yourself this busy season. We all deserve it.
 
Happy sewing everyone,
Ann in Calif. 

Friday, September 29, 2023

Lutterloh Patterns Come Alive!

 Supplement 325 - Model #26 
Loose fitting elastic waist pants
 
    Hello there, Lutterloh enthusiasts. Now that the weather is finally cooling I thought I would wear pants to an upcoming birthday party for a neighbor. This pattern seemed like a good start for something that could be dressed up a little. The review for the top I'm wearing can be found here. 

Pattern Hints:
    Usually I steer clear of the full figure pants patterns because the crotch length is so long for me. This time I thought I might use this to my advantage. Instead of using a number on the Lutterloh scale that was lower than my actual measurement I just enlarged this pattern to my actual body measurement. From past experience I knew this would give me a pattern that was larger than I needed. Because of the semi sheer fabric I was using I wanted pants that would flow around my figure with no clinging. This strategy seemed to work for this pattern anyway. I ended up with a pattern with very loose fitting legs but extra length at the top that needed to be chopped off.
    Here are the pattern pieces for model #26. It's a fairly basic straight leg pant with front pockets. All the length that I subtracted from the top I ended up adding to the length of the legs but this is a normal alteration for me anyway. Fortunately the slit for the pockets was deep enough that I can still fit my hand.
 
Design Changes:
    It doesn't feel like making the pattern extra large was a design change although it did result in a looser fitting pant. The only real design change I made was to line these pants with another layer of the same crepe fabric. To do this I did need to combine the pocket pattern with the front leg pattern. It was easy enough to lay one pattern piece over the other to draw a plain front leg piece with no pocket. My elastic waistband is also 1.5" wide instead of the suggested 6cm folded in half.
 
Fabric Used/Suggested:   
    To make these pants dressier I used a polyester crepe fabric that was just a little sheer. I'm sure they would work just as well in many other woven fabrics. For a more casual look, like in the fashion drawing, I might use linen or even a heavy gauze fabric. Some dressier fabrics like velvet or satin could work too.
 
Closing Hints:   
     This pattern will prove to be versatile in the future for both casual and dressy pants, I'm sure. You can hardly go wrong with a loose straight leg pant with pockets. 
 
Until next time then, happy sewing everyone!
 
Ann in Calif.

Monday, August 28, 2023

Lutterloh Patterns FASHION FLASHBACK

 Supplement 94 - Model #316 (1964)
 
Vintage style nightgown
 
    Hi there folks. This Summer has been pretty hot in California so I find myself in need of some easy, breezy sleepwear. My go to nightgowns are usually from Eileen West but they are pretty darn expensive. I knew as long as I could find the right fabric that they could be duplicated. This is my simplified version.
 
Pattern Hints:
     This 1964 pattern draws out just as easily as any other Lutterloh pattern. I was able to use my modern Lutterloh scale because all the numbers end in either a whole number or a .5 decimal. Some of the older patterns require a vintage scale due to the numbers ending in a decimal other than a half centimeter.
 
    Because I knew I would use a wide eyelet trim for the strap I did need to combine the front and back strap into one pattern piece. The nightgown I was copying had a fairly long strap so I did add one inch between the pattern pieces. The pictures below demonstrate how the pattern pieces look once combined.
    The back yoke includes the back strap so the red line shows where it was cut to create a rectangular back yoke and separate back strap pattern piece. This way I could use the eyelet edge on both the yoke pieces and the inside edge of the straps. I did need to fiddle a little to get a straight line on the inside of the strap piece and the proper curve for the outside edge but the exercise was well worth it. Below is a photo of the finished strap with bias trim on the outside edge.
Design Changes:  
   Other than the obvious sleeveless alteration I did make a few more changes. I only had two yards of fabric so had to shorten my nightgown by almost four inches. Mine also has a one piece front instead of a seam down the center. My front yoke has a center seam instead of being cut on the fold. This allowed me to cut the yoke with the lace edge at the top. Both the front and back yoke seemed a little wide to me so I removed about 3/8 of an inch from the pattern pieces at center front and back.
 
Fabric Used/Suggested:
    Just like the inspiration Eileen West gown, I used a cotton lawn fabric and cotton eyelet lace trim. Cotton lawn makes for a cool wearing nightgown but batiste or perhaps voile or broadcloth might work too as long as the fabric wasn't too crisp. I wish cotton quilting fabric would work for this because of the variety in prints but it usually stands away from the body too much and ends up looking like a tent. A thin knit might work too if it weren't too sheer. It's entirely up to the wearer I suppose if you don't mind a see through nightgown.
 
Closing Hints:
    If you're a fan of Eileen West nightgowns this pattern is a perfect starting point. It would be easy enough to add the typical button placket in the front but I never use it so this simplified version is even easier. Now that I have the yoke and straps worked out for the eyelet trim I will definitely be making at least one more like this. All I need now is the right fabric in a pretty print. 
 
Hopefully you're managing to stay cool this Summer. I'm certainly looking forward to cooler weather. Until next time then.......
 
Happy sewing everyone,
Ann in Calif.

Tuesday, June 27, 2023

Lutterloh Patterns Come Alive!

Supplement 329 - Model #54 
Romper for woven fabrics
 
   Yay! Summer is here! This romper just looked like the perfect Summer outfit for a backyard BBQ. It even has pockets! There is another view, #53, for this pattern but I liked the button front for ease of use. I will talk more about model #53 a little later in the post.
 
Pattern Hints:
    The pattern for this romper is pretty straight forward and I didn't encounter any problems with this view. I made all my usual alterations and ended up with a pattern that went together like a breeze. The other view, #53, is another story however. Below is a pic of the fashion drawing for model #53 with the pattern pieces beside it. I have only erased the numbers for enlarging the pattern but no other symbols or marks.
    If you look closely
you'll see that the front bodice of view #53 is cut on the fold and the back bodice indicates a keyhole opening of just 10cm at the center back neck. The shorts for both views have an elastic waist but no opening for a zipper or buttons. Please correct me if I'm wrong, but I don't know how you're supposed to get into this outfit with just an opening at the neck! I believe that there should be a center back zipper for view #53 just so you can step into it. I might even extend that zipper into the shorts just a little to make it easier to get it on. If I have missed something about this pattern I would really like to know. This is probably just a typo and I'm glad to have noticed it.
 
Design Changes:
   I made only minor design changes to this pattern. My romper has four buttons instead of three and I used bias binding at the arm holes instead of facings. Lutterloh pockets always seem inadequate to me so I used a standard pocket pattern that is much deeper. Lastly, I left off the waist tie altogether since I knew I would wear a belt with this romper.
 
Fabric Used/Suggested:
   For my romper I used a super soft rayon challis. It is a dream to wear when the weather heats up in Summer. This pattern is designed for woven fabrics but you could probably use a knit if it wasn't very stretchy. Whatever fabric you choose I would suggest something with a good drape to it. A stiffer fabric will stand away from the body and cause the sleeves to stick out too. If I were to make another romper I might try a soft chambray or perhaps a limp cotton quilting fabric. Someone very thin might even get away with a very lightweight denim or twill.
 
Closing Hints:
   Other than the glaring issue with a missing opening for this pattern it really is well drafted. It would probably be easier to put on if there was a side zipper that extended below the waist but it is not absolutely essential. That would be just one more step to add to this otherwise easy, breezy pattern. All in all this pattern seems just about perfect to me and I should get lots of wear out of my new romper.
 
I hope your Summer is shaping up to be an enjoyable one.
Happy sewing everyone,
 
Ann in Calif. 

Thursday, May 25, 2023

Can I use a slim fit Lutterloh pattern?

 Supplement 328 - Model #111

 Slim Fit top pattern

    Hello again from California. Hey, have you tried any of the Lutterloh patterns designed for slim figures? They're designated by a dress form outline next to the fashion drawing. These patterns are typically suggested for people with a bust measurement of 90cm or less. I wanted to see if I could make them work for my curvier figure. Similar to "shrinking" the full figure patterns by using a lower number, I used a number 3 dots higher on the Lutterloh scale from my true bust and hip measurements. The good news is that I was able to make it work but the bad news is that it took quite a bit of adjusting. 
 
Modifications: 
   The very first adjustment this pattern needed was at the neckline. Although the fashion drawing shows what appears to be a scoop neck I needed to lower my pattern neckline by two inches to get the shape you see here. The next problem I noticed was that the armholes were going to be too small for me. This is not an adjustment that I usually need to make. I do however typically lengthen my patterns by one inch at the standard cross mark on the pattern. Because this top is a kimono style sleeve I was able to lengthen my pattern above the cross mark and achieve two adjustments at once.
Splitting the pattern at this point allowed me to lengthen the pattern and enlarge the armhole in one operation. This alteration wouldn't work for a set in sleeve so I was glad for this particular style.
 
    The rest of the modifications stemmed from this pattern having very little shaping at the waist. They are intended, after all, for figures that are very slim, not hour glass. I should have tried this on more as I was sewing but it was just an experiment, sooooooo...
Once the darts were sewn and the zipper was installed in the side seam I basted the last seam and realized this still fit like a sack. I took each dart in a little more but it just wasn't enough! Out of desperation I took all the slack out in the back center seam. Since my neckline was lower in the front it turns out I didn't need the button opening suggested for the back neck anyway. This top was not shaping up to be anything I wanted to repeat so I didn't bother with the front belt either. 
 
Fabric Choice:    
    Although my top is certainly comfy to wear I don't think it's what was intended for this pattern. Mine is a rayon nylon blend with some sort of smocking texture built in. If it was intended to be a knit it's definitely the least stretchy knit I have ever worked with. A better fabric choice for this top might be a lightweight shirting, batiste or challis fabric. The fabric needs some drape to it but limp fabric just contributes to it's shapelessness. 
 
Conclusion:  
    As you may have surmised, this is not one of my favorite makes for this year. I'm glad I completed the experiment but I won't be trying any more slim fit patterns anytime soon. It seems they really are designed for the truly slim figures, certainly not hourglass shapes anyway. I would say more likely for rectangle or perhaps more athletic figures. I'll keep my eyes peeled for a similar pattern in the standard range. Until then, there are just so many other patterns to consider...................
 
Happy sewing everyone,
Ann in Calif. 

Wednesday, March 29, 2023

Lutterloh Patterns Come Alive!

Supplement 328 - Model #103
Off Center V neck knit dress
 
   Hello my fellow Lutterloh enthusiasts. It seemed like warmer weather was right around the corner but perhaps I was mistaken. This dress may be a little premature but when I saw the pattern I knew exactly which fabric I could use from the stash.
 
Pattern Hints:
   Because of the off center V neckline on this pattern, you need to draw out the entire front pattern piece rather than just half of a pattern cut on a fold. The center front is indicated on the pattern so it's easy to fold on this line to be sure the two side seams match. I only needed to do a little adjusting to get them the same. Unlike other recent patterns, this neckline seems a little higher than the fashion drawing indicates. After enlarging the pattern to the longer length version I found I needed to cut the pattern in between the two suggested lengths to suit my preference.

Design Changes:
    In addition to lengthening this pattern I also opted to leave off the external casings for the sleeve ties and belt. I find dangling sleeve ties sort of annoying and the waistline belt casing just felt like it would add bulk where I didn't need it. This dress certainly needed some definition at the waist though. The photo below shows how truly roomy it is. I may add elastic at the waist just so a belt is not absolutely necessary. 
   The pattern indicates that the smaller front shoulder piece should be cut on the straight of grain like the rest of the front. However, I cut three different shoulder fronts, one in solid black, just to test out the different looks. I decided on the piece cut on the cross grain just for a little pizazz. This dress is a fairly simple shape so I thought it needed a contrast. As much as I like pockets in a dress I decided to skip those too. This fabric just didn't feel like it would support them without distorting the side seams.

Fabric Used/Suggested:
   This pattern is designed for knits but a stretch woven might work if it had the right drape to it. My striped fabric is a poly/rayon knit with stretch in both directions. I don't know if it's the lightweight nature or the stretchiness of this fabric but it curled at the edges like crazy! This was one of the reasons I decided to skip the casings at the waist and sleeves. I was so tired of wrestling with matching the seams that I just wanted to be done with it. I do love the final result though and may even make another one once I find the right weight knit to use.
 
 Closing Hints:
   Even after all the trouble I had with the fabric I would still like to try this dress again. The neckline is fun and it's a pretty easy project once you get done with the facing. I might even try a ribbing finish at the neck for a more sporty look. The front shoulder piece lends itself to color blocking and even the belt and sleeve casings could be in a contrast fabric. Overall, I'm calling this pattern a keeper for a nice, pullover, knit dress.
 
I have my fingers crossed for some warmer weather ahead so I can wear this dress. Until then...
 
Happy sewing everyone,
Ann in Calif.  

Tuesday, February 28, 2023

Lutterloh Fashion Flashback Frankenpattern


Vintage skirt meets modern bodice

   Hi there, welcome back. I wanted to highlight the versatility of the Lutterloh system with a little experiment. I made the dress shown in the center a while back but wasn't happy that it didn't have pockets. You can see that review here. I suppose I could have just put in side seam pockets but after making this dress for my son's niece I knew I wanted to try the scoop pockets for myself.

Choosing the components:  
   You may have heard that many parts of Lutterloh patterns are interchangeable. I love the skirt on this vintage pattern from 1972 but not the jumper bodice on top. BTW the vintage pattern is also available in the original 1972 supplement #126, or #307 or the newest Vintage Special Edition. On the other hand I knew the bodice of the dress from 2018 fit well and could be easily adapted to accommodate the vintage skirt pattern. The modern pattern is designed for knits and has an empire waist but my challenge was to make it work with the vintage skirt that sits at the waist.
 
Making it work:
    The vintage pattern is designed for woven fabrics but in a knit I knew it would go over my head without the need for a zipper opening. The real trick was to get the bodice long enough to make up for the extra length that I would lose at the top of the skirt. Below is a picture of one of the skirt panels and the front bodice for the 2018 pattern.
 

   Because the pattern is for an empire waist dress you can see the top of the skirt extends above the waist line. The difference between the actual waist and the top of the skirt measured 3 inches on my pattern. This means I needed to add 3 inches to my pattern between the bottom of the bodice and the waistline for the skirt. Since the 2018 pattern included a 1 inch contrast band I decided to add 1.5 inches to the band and another 1.5 inches to the bodice, both front and back. This brought my bodice down to meet the level of the vintage skirt without giving it a strange proportion in relation to the whole dress. 
 
   Not surprisingly, the pattern elements went together just like a Lutterloh pattern should. The A-line skirt was flared enough at the hips that it went over my head without a hitch and the knit waistband makes the whole dress fit closely without being tight. Since I ended up drawing a copy of my bodice pattern I also changed the neckline to a scoop instead of the original V neck. From the beginning I had confidence that this experiment would work and now I'm so glad I tried it.
 
In Conclusion:   
   I have found that the precision of the Lutterloh patterns allows for lots of experimenting like this. Since this skirt style is quickly becoming a favorite of mine I may look for more bodices, in different styles, that will work on top of this skirt. Perhaps a cross over bodice dress is in my future. I'll certainly keep my eyes peeled for more possibilities.

   If you haven't tried exchanging your Lutterloh pattern elements yet I would highly recommend it. It is definitely worth a try since Lutterloh makes it so easy. Here's hoping your Lutterloh patterns are successful whether you decide to follow them or not.

Happy Sewing Everyone,
Ann in Calif.

Monday, January 30, 2023

Lutterloh Patterns Come Alive!

 Supplement 320 - Model #54 - 2021
     Sheath Dress for knit fabrics

    Hi there folks, here we are, sliding into another new year. It seemed a good time to sort through the fabric stash that I inherited a while back. Well, ..... this piece of fabric practically called to me as I handled it. I was blown away by how much it reminded me of the Tommy Hilfiger apparel I had just seen at the stores! The next step was to find a classic knit dress pattern to replicate the shape. Luckily, with Lutterloh patterns, you can exchange similar sleeve patterns so I knew this model #54 would suit the purpose just fine. 
 
Pattern Hints: 
    After drawing many Lutterloh patterns the process does get quite a bit faster and this pattern was no exception. Without the sleeve to draw out, it is really just two pieces, a front and a back. Your sleeve pattern, whichever you choose, is just one more piece. If you choose to use facings you'll still be using the same pattern pieces.
 
    It seems the trick to getting a really great fit on such a close fitting dress is to make sure the waist and hip curves are in the right places. Fonnell wrote a great post a while back that explains a way to help get this just right. There is a link to that post on our side bar, #7 adjusting for the curves, shoulders, hips etc.
 
Design Changes:   
     I did notice, after enlarging the pattern, that the neckline, like so many others lately, was a little too open for me. I knew I could change that at the same time that I made it a deeper scoop.                                                                         
The photo above represents the changes that I made to the front of this pattern to get the dress I am wearing in my completed photo. I lowered the neckline by an inch and a half and extended the shoulder line inward by a half inch to give me more of a scoop neckline. I also cut the pattern apart below the line for the shorter version so I could add 3 more inches to the length. When altering the back pattern to match, I only changed the shoulder and length. This was always intended to be a casual dress for me so rather than using facings I finished the neck, sleeves and even the hem with a ribbing band.

Fabric Used/Suggested:
    The model for this dress appears to be wearing a sweater dress and I'm sure this would be a terrific option for this pattern. Because it's such a classic shape, there are so many knits that would work great for this pattern. As I mentioned earlier, this particular piece of cotton knit fabric dictated the pattern for me. Unfortunately, I only had a limited amount of this fabric and just couldn't find a way to squeeze out the sleeves. I decided a coordinating yet similar fabric would have to do. I love the result of my intentionally different fabric! The ribbing seemed like the best way to pull all this together and now I have a nice, casual dress to wear once the weather warms up.

Closing Hints:
    I have been looking for a classic knit sheath dress pattern and I think I've finally found it. I made a sheath pattern some time ago by combining two patterns and that actually worked just fine. You can see that dress here. The best part about having a pattern already drafted for the right shape is the ease with which you can draw it again in any size. This one is a keeper!
 
I hope you are all finding some time for sewing or at the very least perusing your Lutterloh patterns for the future. Stay warm everyone.
 
Happy Sewing then,
Ann in Calif.