Thursday, May 19, 2011

Time for my pattern fitting secrets

 I have picked up a handful
of fitting hints I should not keep secret!

Sewing should be FUN. That is why we buy and use Lutterloh.
Why not master some great ways to fit your patterns?


When you think about fitting a garment the first thing to consider is:
"what does everything hang off of?"

Starting at my head my next widest part is my shoulders.
All my dresses and tops hang off my shoulders so
why not get that part of the pattern correct every time with a this tool.

My handy tool is a tracing of my neck and shoulders.
  I had my daughter trace me with a pencil.
It took a couple of tries with a three year old about.


This is the paper tracing.  It was taped to the wall and needs some touch up 


Let's start with getting the shoulder correct.

1) Collect a piece of paper wide enough and long enough to
capture a tracing of your shoulder and neck.

2) Make a straight line down the center of the paper.  We just folded ours in half.

3) Tape the piece of paper on the wall at a level you 
can stand at and easily be traced from
Stand so you are in the middle of the center line.  
Your helpful friend can make sure you are in the center.
 
4) Have someone trace you by holding the pencil straight up. Start at the neck below your ears, trace all the way down your shoulder and slightly onto your arm.
Repeat for the other side.  
Don't move one more step......

Have your helper put a nice big dot at your neck just as it turns
to your shoulder (where a neckless chain would rest)
and then at the peak of your shoulder.
To find that raise your arm and feel for the space where the shoulder bends.

5) Take down the paper and using a french curve tidy up and smooth out your shape.  You can use a marker for this to make a nice dark outline.  I put my
Shoulder shape on a piece of cardboard.  It gets used over and over again.
 
Now each time you make a Lutterloh pattern you can lay it over your shoulder shape and see if it fits you properly.  If it doesn't use the fix I show you in the photos below.

This will also help you see if the garment is much too wide
across the shoulder or too narrow.


This is the tidied up shoulder that I traced on cardboard.
I also added a red line to note the lowest I'd want a neck line to go.
Might as well check that while I do the shoulder check. 


I'm going to use a commercial pattern so you can see it on the white cardboard background.  My Lutterloh patterns are all made on White paper.
White on White in photos? I think not.

This is a princess line top I've made before.
We only need the part of the pattern that will hang off our shoulder.


  Fold back any button bands, etc.  We will lay the center line of the pattern on the center line of our shoulder drawing.


Now for the fun.  Lay the pattern on the center line and
match the pattern to the shoulder. 
I never put seam allowances on my Lutterloh patterns.  I add them on the fabric.
This pattern however has 5/8 seam allowances so I have red penciled them so I can avoid using them.  We want to do our measuring on the stitching line.
The pattern is also a multi-size pattern and I am using one of the smaller sizes, so you will see that extra paper.
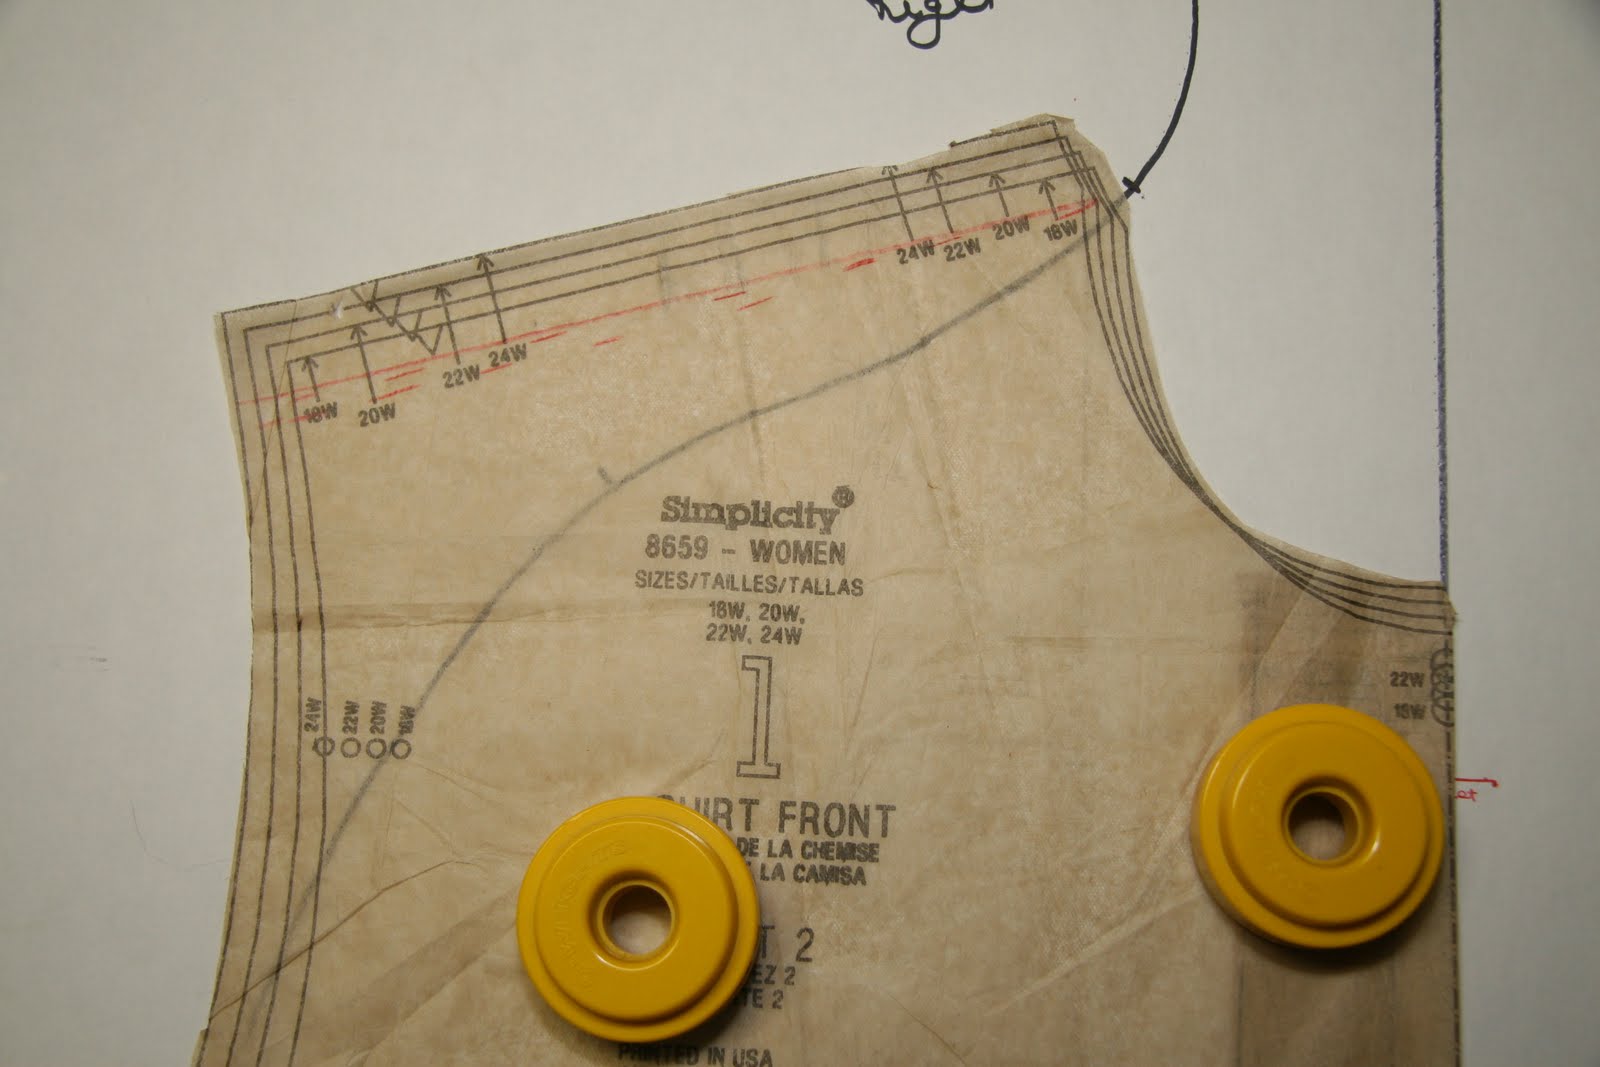


Here's a nice close look, remember it's a multi-sized pattern so the
paper above the neck mark is the larger sizes not in use.
Hum looks like a lot of fabric I don't need.


I've laid two rulers down. One on the shoulder of the pattern, one on
my shoulder line.  It was over 1 1/2 inches different.
That extra fabric becomes a bubble of fabric above my bust.
It makes my armscye too large also if this was a sleeveless top
I'd have a loose arm hole.

This can work both ways.  
Your shoulder could be higher than your pattern allows
for and you may need to add fabric.


One important note: If I was going to put in a 1 1/2 inch shoulder pad then I should NOT make this change! 
The shoulder pad will take that space. 
Maybe I will put in a low shoulder pad
then make a small adjustment in the shoulder.

Ready to correct this problem?

1) establish two cutting lines
One line horizontal about 2 inches below the armscye.
I use my cutting boards lines to get a nice straight line.
  Just mark it with a pen.


2) Make a 2nd pen line vertical from the shoulder
(about 2 inches or so from the armscye)
To the Horizontal  line you just made


Note: Before I go any further, because I know this pattern
I have pinned out the extra width in the shoulder. 
I will have to add a large bust change but that's another issue. 
This pattern is much too far down my shoulder and would look
like a drop shoulder which it is not. 
If your bodice hits your shoulder where you want it no change need be considered.

3) Here is the piece I marked in two directions and now cut free
from the bodice pattern.
It will help me correct that extra 1 1/2 inch shoulder problem.
It looks shocking to cut up a pattern but we will put it back together soon!

4) Slide your loose piece to the point that it hits your shoulder at it's armscye end.
Click on the photos to see this up close.
Remember I have a seam allowance in the way.
Be sure to match the sewing line to your shoulder with both pieces.

  I now have one pattern piece up high and one down
where it should be on my shoulder.

  (Because I still need to loose some of the width of this shoulder 
I have overlapped the two pieces a little, You may not need this so 
slide the lower piece right next to the higher piece butt them 
together don't overlap them. When using a Lutterloh pattern I use a size that fits better than this commercial pattern does)


5) If this is was a larger amount to remove you would need some spare paper underneath to add to the missing spaces you encounter.  Lay your ruler down on top of the shoulder line you see underneath the pattern.
Now draw a nice  line across the two pieces.
It should connect the highest point with the lowest.


Here is the finished shoulder.  
My top should hang on my shoulder perfectly now!

It's a much better start to have the pattern hanging off the shoulders
correctly before you do anything else. 
If you removed/added some from the neck edge (I didn't) then remove/add 
that amount from your collar.  Don't remove it from the center back, remove
it from the shoulder line.  Photo to follow.  

Because this was a multi-sized pattern I just folded over the pattern pieces.
With your Lutterloh pattern just cut off the un-needed area.

DON'T FORGET TO REPEAT THIS ON THE BACK PIECE.
Small adjustments may be needed on the sleeve.
Walk it in the armscye and see if you need to adjust this. 
I'll show sleeve adjustment in my next posting.
************************************************

Did that hint give you some ideas? 
Well here are some more hints to help make every pattern fit you and your shape.
*******************************************

Let's do some FRENCH CURVE work.


  Yes get that curve out and let's learn how to use it to get the fit we want.
By comparing some of our best fitting garments we can transfer
Our French curve shape to the Lutterloh patterns.

Look at all the places you use the French curve in pattern making. 
Many of these locations can be checked in our favorite
clothes and used on our Lutterloh pattern.

Use the french curve to note your hip shape 


Save your favorite hip shape from your pants or your skirt and use it over and over
Check the curve in your crotch to improve fit.  
CAUTION:  The area without red in the crotch should be mostly straight.


This is where the French curve shines. 
Note your favorite necklines
Check your favorite sleeves 


Check your Cap and curve 
see why you never never like your garments sleeves by comparing the french curve lines with a favorite garment. 


The French curves have numbers all the way around and down the French curve.  These are the numbers we will want to note.
I am using my favorite curve in the photos below.

HIPS:  repeat your hip shape by noting the numbers on the curve that fit your hip shape.


 These are my favorite pants, most of my skirts are gathered
but you can get this shape from a skirt also.
I work from just below the waist band down to just past the widest part of my hip.
REMEMBER: place the French curve on the seam line not the cut edge.

As you can see in this photo my widest part of my hip is only 4 inches
down from my waist.  It hasn't mattered if I was skinny or thick,
it's still just 4 inches.

I used the straight edge of the French curve to show you that you only need to measure the curve area, once your leg is straight it is not a french curve area.
If you need to see where the curve ends just lay a yard stick up the straight of your leg and note where it no longer touches the pant.
Measure from there to the waist.
Slide the French curve up and down until you find the perfect match to the shape.
******


1) Find an outfit that fits as you like, a skirt or pair of pants work.
Smooth it out on the table, wrong side out is sometimes a better
way to see what the shape of the skirt is. 
Only measure along the stitching line.

2) A French curve will fit any curve but you must move it up and down until it perfectly fits the shape you want to take note of.

3) Write these important fitting numbers on a bright recipe card.
At the waist band bottom what number is on the french curve?
Write it as top #__.
With out moving the french curve note the place were your body
no longer curves but hangs straight.
That would be Bottom #___.

Now when you make a skirt or even a pair of pants you can take your french curve and check that the Lutterloh pattern fits your shape. Match the top number you wrote down to the pattern waist, and the bottom number to where the curve ends. Did your pattern match the French curve?  If not trace around the French curve and use the new shape.
This is a quick easy change to make. 

REMEMBER measure on the stitching line not the cutting line
  ********

This little trick works for your neck line also.

  I don't like surprises when I make a neckline.
I don't like it to be too loose, or too low or not look perfect.

Take a couple of necklines you really like and using the french curve
do as you did for your hip.

1. Fold the top or dress in half so you only work with half the neck. 
2. Move the french curve on the neck line until the shoulder seam
and the bottom of the neckline match the french curve. 
You can see the direction I have placed the curve in the photo above.

REMEMBER: you measure the sewing line not any facings or neck finishes.

This is a V neck I really like, it isn't straight but curved a bit.
Because it is a V neck I did not fold the top as the V was clearly the center.
It is also a knit so I washed it first to make sure it wasn't stretched out from wearing it.

3. Note the number at the shoulder seam as Top #___
Note the bottom of the neck as Bottom #___

You can barely see the V in this busy top.
But the numbers are Top 12 2/8   Bottom  22


I have only showed you the hips curve and the neckline. 
You can use this for the armscye and the crotch of your pants.
I will address those in another posting as there are several issues to show you. 
So for now go measure some hips and necks in your favorite outfits.  Write the top number on the curve and the bottom number on a master sheet
and put them to use in your pattern making. 


Hope this improves all the patterns you
make from here on!


Here is where you can get more information on these techniques.
Using the shoulder slant = Threads fitting DVD Series Torso


Using your french curve=Peggy Sagers DVD Success from the start
http://www.silhouettepatterns.com/html/media.htm 
This is a great video that will teach you how to compare all your patterns to the clothes you like to wear. If you struggle to understand sleeves this also answers the questions you didn't know you had.  I love this video! 


Tuesday, March 1, 2011

"Reading" the Lutterloh Fashion Drawings

Greetings Lutterloh Fans! Fonnell and I both had a crazy busy holiday season but things are calming down for me a little now. That must mean it's time to get some sewing done right?!


Well, I've decided I need to get some more pants sewn for work but I must admit I have not been entirely pleased with my last couple of pants patterns. Don't get me wrong, I love the fit of all the Lutterloh patterns I've made. I'm just having trouble finding the right pattern to flatter my figure. This is where "reading" the Lutterloh fashion drawings comes in. Most of the major commercial pattern companies use terms like fitted, semi-fitted, loose fitting, regular rise or low rise to describe the fit for their patterns. Unfortunately, Lutterloh gives far fewer directions for their patterns so we must interpret the intended fit of a pattern from their fashion drawings.


The last two Lutterloh pants I sewed did produce pants that fit beautifully and I can certainly wear them but neither one are the most flattering shape for my particular figure. Here is the drawing and pattern pieces for the first pair I made:


On the model I thought this looked like a narrow, straight leg pant. If I were shaped like a narrow legged model perhaps this is how they would have fit me. What I ended up with were pants that were too slim in the thigh area and tapered all the way to the ankles; not a good look for me.


The next pattern I tried was this one with much looser legs:


Although the width of the legs was far more flattering I found the rise of the whole pants to be much higher than I'd expected. So, even though I have two pairs of pants that indeed fit, I don't feel all that comfortable in them.


Learning from my mistakes

Now that I have some more time to sew I am determined to find a Lutterloh pants pattern that will both fit comfortably and flatter my shape. I did learn a few things about my fit preferences while sewing the last two pants patterns. First, I need a roomier leg width to accommodate my fuller front thighs. Secondly, I prefer a lower, shaped waistband to a straight one. I also learned that, like most ready to wear pants, Lutterloh patterns are a little short on me.


With all this information gleaned from my first two patterns I decided my next choice should be analyzed a little more carefully.
If you look closely at the two front pants patterns you'll see that the zipper placket is shorter on the first pattern. This lower rise in front combined with the back yoke of the second pattern will help me alleviate the gap I sometimes get in back from my slight sway back. I know I need to look for a wider leg but I don't want it to be slouchy like the second pattern. So, this is the pattern that I've chosen to try for a happy medium:


I'm hoping this pattern has all the elements that I liked from the first two without the pitfalls of my previous fitting woes. I have the back yoke to adjust for my sway back, the shaped waistband and the wider legs without being a true wide leg pant. I may need to sew deeper seams when attaching the front waistband. I noticed the zipper placket appears almost as high as the second pattern. I will definitely leave off the front cargo pockets too. I don't need a puffy pocket right on top of the fullest part of my legs.


Onward and Upward

To cut down on surprises later I like to do a little flat pattern measuring of my pattern before I cut it out. First I will measure across the mid thigh area to be sure I have enough room. This pattern looks good for me. Next I will find the knee position of my pattern to determine where I need the extra length I've been missing. Although Lutterloh patterns give us the cross mark for lengthening/shortening lines, there's no point in arbitrarily lengthening there if this will then drop the knee point below my actual knees. Here are a couple of drawings to demonstrate how to find the knee position on your pattern.


The drawing on the left shows a red line at the bottom of the front pant leg and another red line at the crotch point. This is done before any seam or hem allowances are added. Now if I take this pattern piece and fold the bottom red line up to meet the red line at the crotch point the resulting crease in between represents my knee position. I have marked this as a green line in the drawing on the right.


When I paper fit my pattern I found that the knee position was right about where it should be already. So, since this pants pattern has fairly straight legs, I've decided to just add the extra length to the bottom of the pattern. I want to make sure to have at least a one inch hem allowance so I'm adding three inches to the length of the front and back leg pattern at the hem.


Evaluating the finished product

Well, I'm finished with the pants and I'd say they came out just as I expected this time. The waistband hits me at my natural waist, the legs are wide enough to accommodate my front thighs and finally I have pants that I can put in the dryer without fear of ending up with floods. Here is a photo of my finished pants:


I made them out of a flat sheet that I was going to donate anyway. I see no point in getting rid of perfectly good fabric if I can use it myself.


Now that I've tried a few different pants drafts from Lutterloh I think there's just one more I should draw out to truly evaluate if I have found my favorite. I still think I need to try a true jeans pattern draft. I will look for one with the yoke in back, a shaped waistband, straight but not wide legs and a zipper fly that appears a little shorter than the last two pants I've made. I'm still trying to find a waist that is high enough in back to avoid gaping but hits slightly below the waist in front. I do believe I'll have to start with a waistband that hits below the waist in front and then make a longer crotch length in back to compensate for my swayback; nothing I haven't done before.


With all the practice I've gained through making all these different pants patterns I'm confident now that I can accurately "read" the Lutterloh fashion drawings!

Monday, May 10, 2010

Yes we are still here

I'm delighted to see new Lutterloh owners getting to work making vests and figuring out the issues to making patterns.

Ann and I have put a lot of great postings you can work from on this blog. You'll see them linked over on the right. We are here just listening in for possible needs so feel free to put your comments on any posting, we do get these.

I hope you are having a good time with all those new patterns. We find a good Lutterloh pattern book great night time reading!

Enjoy!

p.s
There is a link on the right for making knit patterns into woven.


http://sewingnhumming.blogspot.com/2010/01/red-group-using-knits-on-lutterloh.html

Tuesday, March 23, 2010

Some Spring Sewing

So, were you wondering what ever happened with that basic pattern I was slicing and dicing in my previous post - "More Manipulating of Lutterloh Patterns" ?

http://sewingnhumming.blogspot.com/2010/03/more-manipulating-of-lutterloh-patterns.html

Well, I finished the outfits for my niece's birthday present. I'm sorry I can't have her model them for you but her birthday isn't for a couple of weeks yet. Here's some photos of the finished outfits nonetheless.


Here's the pattern that I used for the pants. I eliminated most of the details to make the sewing faster. These are just lightweight cotton capris so I didn't see the need for the pockets and fly zipper anyway.


For the pants pattern I still cut out the front pocket piece in case I wanted to use it later. When I cut out the fabric I just taped the leg pattern over the pocket pattern and cut them as one piece. I still drew in the fly extension on the pattern too but I folded it back at the center front dashed line so I could just sew a center front seam there.


It's hard to see the yoke detail in the back but it's there. I used buttonhole elastic in the back only so the front will still lie nice and flat. That buttonhole elastic really is ingenious for thin little children who only seem to get taller but not much bigger around.


I hope you will all consider these kinds of changes to a basic pattern to stretch your Lutterloh catalog. With a little ingenuity and some testing on inexpensive fabric you really can have a bunch more designs in your repertoire.

Monday, March 15, 2010


Cheryl has been working from the bottom up and we are so delighted she didn't give up. Ann and I both think the Vest has to be the start then all projects get easier. Way to go Cheryl! By the way sleeves are always a bit of a challenge.
F.


Attached is a photo of my finished jacket. I am really pleased with how it turned out. Here's what I did:

First, I made the Lutterloh vest. I used it for a sloper for fitting. I followed your instructions on your blog for that, and it was easier than I expected. Then I made my pattern for this jacket and used the sloper to make sure everything was in the right place, (waist line, bust point, etc.). I made a muslin of the jacket first for practice. I did have to shorten the waist. This jacket is a princess line in front with a two-piece sleeve. The fabric I used is a moleskin from my stash. Since this was sewing for weight loss, the princess line is good. I didn't line it so that I could take in the seams easier as I lose weight. However, this pattern would be nice with a lining, but that's another project.

I did have to rip out the sleeves after the first try since I noticed a little twist in the way the sleeve hangs. Repositioning the sleeve helped that, but I think I didn't get the curve of the cap just right when I drew the pattern. However, the sleeves look alright, but next time the curve needs to be different somehow.

I learned a lot about fitting myself, and I thank you very much for the help you gave me. I like Lutterloh patterns much better now. This jacket was fairly easy to sew together by following the way the pattern is connected. The seams that are sewn together are matched on the little pattern.

Well, Fonnell, thank you very much for arranging this sewcial. I have been following Ann's garment also, for knits, because I have some knit fabrics to sew, and I worry about getting them to fit without being too tight. I appreciate her help also.

Thanks,
Cheryl

Friday, March 12, 2010

More Manipulating of Lutterloh Patterns

In this tight economy who doesn't want to get the most bang for their buck? Here I'll outline how I'll use one simple pattern to create a couple more designs with more pizazz.


For those who want to follow along as I make my niece's birthday outfits this is where I'll start. As I mentioned in the previous post:


my niece K is quite small for her age. I recently made a corduroy jumper for her that fit great, so I've decided to start with that pattern for her tops.


Above is a photo of the fashion drawing and the corresponding pattern pieces I'll be using. There are actually additional pieces for the contrasting yoke and pocket pictured but I won't be using those.


Because this pattern uses such simple pieces I like to use it as an opportunity to manipulate the pattern a little to get some more interesting designs from it. I'll start with shortening the pattern by a few inches for a top because K let me know that she does not like to wear dresses. I wish I'd known that before I made the jumper.


So, with a little drawing on my small scale pattern pieces I came up with two different new designs. There are so many adorable fabrics out there for children that I want to use several of them in these outfits. Here are rough drawings of my new designs for this pattern:


The pink lines indicate where I'll cut the pattern apart to make new pattern pieces. The upper pattern will produce a top with a panel effect allowing me to use two different fabrics. I'll be sure to end my princess line at the same point on the front and back shoulder so they match up. Because I don't have to worry about bust shaping for a princess line pattern for a toddler I can just add seam allowances on all the edges except the center front where I'll cut on the fold. I wouldn't recommend this kind of slicing of the pattern for a grown woman. Once you cut through the bust area there are a whole set of issues you must address to fit the rounded bust area. Below is a photo of my new pattern pieces for the first design. I have relabeled them with the familiar Lutterloh symbols to distinguish them from the original pattern.


A = front, AC = side front, B = back, BC = side back


The second design will allow me to make a top with a yoke and contrasting gathered skirt. On the full size pattern I'll need to start the yoke line at the same point on the armscye and then measure up from the bottom edge on both the front and back pieces for the end point. I'll then start with the same number on my curved ruler to draw the yoke line so the curve will be close to the same, front and back. I'll need to slice my pattern up some more to get enough fabric to gather onto the yoke. Here's what it will look like cut into pieces.


To get the fullness I need to achieve a gathered skirt I've split the pattern in three places all parallel to the center grainline. On each pattern piece I make sure to start the first and last split at least an inch away from center front or back and again an inch away from the point at the armscye. I just make the center split at a halfway point between those two.


I want to spread the pattern so I end up with nearly double the fullness of the original. I measure the length of the curved seam from the center front or back to the point at the armscye to determine how much to spread between each split. Let's say the top of the pattern piece measures 5 inches. To double the fullness I'll need to add 1-3/4 inches between each split to increase the width to about 10 inches. Once I fill in the spaces with paper I need to draw a new cutting line to smooth out the curve at the top. In the photo above I've marked this in pencil.


Below is a photo of what the pattern pieces will look like all filled in and relabeled with the Lutterloh symbols. Notice I included the wavy line at the top of the skirt pieces to tell me to gather there. Stopping the gathering before the armscye will make it easier to finish the armhole with binding.


A = front, AL = front yoke, B = back, BL = back yoke


Now, before I do any slicing and dicing of my original pattern I will draw a new copy to keep as a master pattern. This way I can start with this same shape over again by drawing new copies for each new design. I'll also draw copies of the facing pieces I've worked out for this master pattern. Once I sew the princess line pieces back together I should have the same shape as the master pattern so I'll use the same facing pattern pieces. For the yoked top I'll just cut two each of the front and back yokes and use those for facings.


Alrighty then, this is the general outline for starting K's tops. I'll get to the pants later but I'm anxious to get sewing.


For the finished photos go to :

http://sewingnhumming.blogspot.com/2010/03/some-spring-sewing.html


If you're interested in more ways to stretch your patterns with similar techniques check out this post :

Monday, March 8, 2010

The Lutterloh System for Children

I don't know how many of you sew for children in your lives but I'm about to start a birthday gift for my niece and thought you might like to follow along.

Just like adults, children come in all shapes and sizes. Lutterloh does have a size standard that they design for to help us judge what size we should be working from.


Unfortunately neither of the children I sew for fit this scale that Lutterloh uses. This doesn't stop me from using the Lutterloh patterns for children with great success though. For children Lutterloh wants us to use only the chest measurement. Even very thin and rather plump children still have little shape to their torsos so the chest is usually the largest measurement we need to fit. An exception to this rule would be for a very round child whose tummy extended past their chest measurement. In this case you may need to use the waist measurement to fit pants and skirts. The key is to make sure to choose patterns in the correct size range and make adjustments for length.

So how do I decide what the correct size range should be? Well it just so happens that both of the children I sew for are 5 years old. However, both of them are very small for their age. My friend's son I'll call "R" is just small all over and rather short legged. His chest measures 56cm. My niece "K" is very thin and only slightly shorter than her classmates. Her chest measurement is only 54cm. As you can see, compared to the chart neither of them come close to what Lutterloh thinks a 5 year old should measure. I typically choose Lutterloh patterns in the 2-6 year range for them. According to the chart K doesn't yet fit into the 2-6 range but I know she has a vastly different shape from a 1 year old baby. Choosing patterns for a baby for her would result in garments that were way too short all over. Babies tend to have shorter, plumper limbs than older toddlers so I at least need to stick with a toddler size range.

You'll see from the 1976 photo above that Lutterloh generally tends to categorize their patterns in ranges that cover about 4 years with some overlapping going on. If you had a rather "large for their age" 4 year old you might very well be able to use all the patterns on this one page. I have found that for K I can now use patterns in the 2-6 up to the 4-8 range. Because I use her chest measurement my patterns fit great in all the circumference areas but because this measurement is so small I then need to lengthen them all. The smaller range patterns I usually only need to lengthen a couple of inches but I recently drew out top and pants patterns in the 4-8 range that I needed to lengthen by more than 5 inches.

So, when deciding what size range to use for your child, you need to consider their stature as well as their measurements. Ask yourself is my child average sized compared to other children their age? For very petite children you may need to use a smaller size range than their age. For the bigger, fast growing children you may need to use patterns intended for slightly older children. Just remember to always at least paper fit your pattern before cutting out your fashion fabric. This should give you an idea if you need to make any length or ease adjustments before any fabric is wasted. If your child is far from average it might be a good idea to make a test garment in an inexpensive fabric first. This will help you determine the adjustments you need to make to all the child's patterns in this range. At least until they grow again. :)


Check out the next post:

http://sewingnhumming.blogspot.com/2010/03/more-manipulating-of-lutterloh-patterns.html

for more info on the patterns Ann will be using for K's gift.

Sunday, March 7, 2010

From the orginal Blog I deleted

I first started this Blog to help anyone trying to use the Lutterloh system. When I was asked to remove my blog I lost this posting. Today by magic it was found. I say Magic because I have no idea why someone else had it online but I was able to find it and return it here.
Soon you will see a posting from Ann that will get you started in some more sewing for children. I can't wait! Until then enjoy how I make Lutterloh patterns for babies!


Tuesday, April 14, 2009
What to do if the size is a small child


I have many old Lutterloh books from all over the world. The fashions are breath taking, the history is loud and clear. There is a new baby in our family, a grand daughter and her mom wanted a special dress for her church ceremony. I took out my books and found this sweet little dress. The book it is in came from Brazil so I can't read the pre-directions in the front. he he!


#107


The only problem I found is Penny is only a tiny thing and she measures 46 on the Lutterloh ruler. If you look you will see there isn't a 46, the smallest it goes is to 50. If I use 50 that will make this dress TOO BIG. You may run into this one day and so here is what I did.

1) Put the holding pin in the bottom most hole and put it through the X in your pattern

I used pattern #107 below. Lets make the skirt


2) Make a second ruler top by printing a copy of yours on card stock.
You will use this to remove the extra.


3) Do a little math on the newly printed ruler. Penny's pattern will be too large by three spaces 46 to 50 on the ruler count to the 4Th line to get the three spaces. A sticky page marker put on the spot helps. Or just work from a number close to yours I used 66 and put a marker and went to 60 on the card stock tape top.

4) I put my pin in at 50 and Penny needs her pattern made at 46. The first number on the skirt pattern is #23 at the top waist. I pull my tape out and find #23 on my original tape then I lay my printed card stock tape top on the #23 line and measure off my three spaces. I made my mark there. Don't be tempted to just add on the original tape measure because it won't be correct. It is slightly different. Be sure you put your Dot on the correct side of the tape, the side that lines up with the Number #23 line at the pattern.

We are subtracting the three spaces for the correct size.


I have two tapes the green shows the 23 the pattern showed the orange tapes show the amount I must remove. Yes remove. so I put my dot at the top orange mark, 3 spaces above the bottom orange tape.


Once you do the math this goes just as fast as any pattern would and I got a perfect size pattern. I always lay the pieces out and measure to be sure I have the kind of ease I would want in a pattern.

Penny is a baby and everyone will be picking her up and down so I wanted to be sure there was room for her comfort. She measures 17" in her chest and the pattern made 22". That is 5 inches of ease and that will be plenty and work with that full skirt.


This is the finished dress. My daughter in law wanted the dress shorter, only to the babies feet and she had the idea for adding the ribbon. I can't wait to show her my Lutterloh baby dress! I think I would have removed an inch of the ease now that I see it on her but I was far away when I made this dress and could only guess by using the measurements.