Welcome to your best source for free Lutterloh tips and system information! We are a couple of fans of the Lutterloh patterns who love to sew clothes that fit. You too can successfully make a wardrobe from your Lutterloh pattern book. Be sure to check out our side bar for links to Lutterloh dealers and all of our best tricks! DISCLAIMER: Some patterns and tools have been provided by the Lutterloh company for our unbiased review.
Tuesday, March 23, 2010
Some Spring Sewing
http://sewingnhumming.blogspot.com/2010/03/more-manipulating-of-lutterloh-patterns.html
Well, I finished the outfits for my niece's birthday present. I'm sorry I can't have her model them for you but her birthday isn't for a couple of weeks yet. Here's some photos of the finished outfits nonetheless.
Here's the pattern that I used for the pants. I eliminated most of the details to make the sewing faster. These are just lightweight cotton capris so I didn't see the need for the pockets and fly zipper anyway.
For the pants pattern I still cut out the front pocket piece in case I wanted to use it later. When I cut out the fabric I just taped the leg pattern over the pocket pattern and cut them as one piece. I still drew in the fly extension on the pattern too but I folded it back at the center front dashed line so I could just sew a center front seam there.
It's hard to see the yoke detail in the back but it's there. I used buttonhole elastic in the back only so the front will still lie nice and flat. That buttonhole elastic really is ingenious for thin little children who only seem to get taller but not much bigger around.
I hope you will all consider these kinds of changes to a basic pattern to stretch your Lutterloh catalog. With a little ingenuity and some testing on inexpensive fabric you really can have a bunch more designs in your repertoire.
Monday, March 15, 2010
Cheryl has been working from the bottom up and we are so delighted she didn't give up. Ann and I both think the Vest has to be the start then all projects get easier. Way to go Cheryl! By the way sleeves are always a bit of a challenge.
F.
Attached is a photo of my finished jacket. I am really pleased with how it turned out. Here's what I did:
First, I made the Lutterloh vest. I used it for a sloper for fitting. I followed your instructions on your blog for that, and it was easier than I expected. Then I made my pattern for this jacket and used the sloper to make sure everything was in the right place, (waist line, bust point, etc.). I made a muslin of the jacket first for practice. I did have to shorten the waist. This jacket is a princess line in front with a two-piece sleeve. The fabric I used is a moleskin from my stash. Since this was sewing for weight loss, the princess line is good. I didn't line it so that I could take in the seams easier as I lose weight. However, this pattern would be nice with a lining, but that's another project.
I did have to rip out the sleeves after the first try since I noticed a little twist in the way the sleeve hangs. Repositioning the sleeve helped that, but I think I didn't get the curve of the cap just right when I drew the pattern. However, the sleeves look alright, but next time the curve needs to be different somehow.
I learned a lot about fitting myself, and I thank you very much for the help you gave me. I like Lutterloh patterns much better now. This jacket was fairly easy to sew together by following the way the pattern is connected. The seams that are sewn together are matched on the little pattern.
Well, Fonnell, thank you very much for arranging this sewcial. I have been following Ann's garment also, for knits, because I have some knit fabrics to sew, and I worry about getting them to fit without being too tight. I appreciate her help also.
Thanks,
Cheryl
Friday, March 12, 2010
More Manipulating of Lutterloh Patterns
For those who want to follow along as I make my niece's birthday outfits this is where I'll start. As I mentioned in the previous post:
my niece K is quite small for her age. I recently made a corduroy jumper for her that fit great, so I've decided to start with that pattern for her tops.
Above is a photo of the fashion drawing and the corresponding pattern pieces I'll be using. There are actually additional pieces for the contrasting yoke and pocket pictured but I won't be using those.
Because this pattern uses such simple pieces I like to use it as an opportunity to manipulate the pattern a little to get some more interesting designs from it. I'll start with shortening the pattern by a few inches for a top because K let me know that she does not like to wear dresses. I wish I'd known that before I made the jumper.
So, with a little drawing on my small scale pattern pieces I came up with two different new designs. There are so many adorable fabrics out there for children that I want to use several of them in these outfits. Here are rough drawings of my new designs for this pattern:
The pink lines indicate where I'll cut the pattern apart to make new pattern pieces. The upper pattern will produce a top with a panel effect allowing me to use two different fabrics. I'll be sure to end my princess line at the same point on the front and back shoulder so they match up. Because I don't have to worry about bust shaping for a princess line pattern for a toddler I can just add seam allowances on all the edges except the center front where I'll cut on the fold. I wouldn't recommend this kind of slicing of the pattern for a grown woman. Once you cut through the bust area there are a whole set of issues you must address to fit the rounded bust area. Below is a photo of my new pattern pieces for the first design. I have relabeled them with the familiar Lutterloh symbols to distinguish them from the original pattern.
The second design will allow me to make a top with a yoke and contrasting gathered skirt. On the full size pattern I'll need to start the yoke line at the same point on the armscye and then measure up from the bottom edge on both the front and back pieces for the end point. I'll then start with the same number on my curved ruler to draw the yoke line so the curve will be close to the same, front and back. I'll need to slice my pattern up some more to get enough fabric to gather onto the yoke. Here's what it will look like cut into pieces.
To get the fullness I need to achieve a gathered skirt I've split the pattern in three places all parallel to the center grainline. On each pattern piece I make sure to start the first and last split at least an inch away from center front or back and again an inch away from the point at the armscye. I just make the center split at a halfway point between those two.
I want to spread the pattern so I end up with nearly double the fullness of the original. I measure the length of the curved seam from the center front or back to the point at the armscye to determine how much to spread between each split. Let's say the top of the pattern piece measures 5 inches. To double the fullness I'll need to add 1-3/4 inches between each split to increase the width to about 10 inches. Once I fill in the spaces with paper I need to draw a new cutting line to smooth out the curve at the top. In the photo above I've marked this in pencil.
Below is a photo of what the pattern pieces will look like all filled in and relabeled with the Lutterloh symbols. Notice I included the wavy line at the top of the skirt pieces to tell me to gather there. Stopping the gathering before the armscye will make it easier to finish the armhole with binding.
Now, before I do any slicing and dicing of my original pattern I will draw a new copy to keep as a master pattern. This way I can start with this same shape over again by drawing new copies for each new design. I'll also draw copies of the facing pieces I've worked out for this master pattern. Once I sew the princess line pieces back together I should have the same shape as the master pattern so I'll use the same facing pattern pieces. For the yoked top I'll just cut two each of the front and back yokes and use those for facings.
Alrighty then, this is the general outline for starting K's tops. I'll get to the pants later but I'm anxious to get sewing.
http://sewingnhumming.blogspot.com/2010/03/some-spring-sewing.html
Monday, March 8, 2010
The Lutterloh System for Children
Just like adults, children come in all shapes and sizes. Lutterloh does have a size standard that they design for to help us judge what size we should be working from.
Unfortunately neither of the children I sew for fit this scale that Lutterloh uses. This doesn't stop me from using the Lutterloh patterns for children with great success though. For children Lutterloh wants us to use only the chest measurement. Even very thin and rather plump children still have little shape to their torsos so the chest is usually the largest measurement we need to fit. An exception to this rule would be for a very round child whose tummy extended past their chest measurement. In this case you may need to use the waist measurement to fit pants and skirts. The key is to make sure to choose patterns in the correct size range and make adjustments for length.
So how do I decide what the correct size range should be? Well it just so happens that both of the children I sew for are 5 years old. However, both of them are very small for their age. My friend's son I'll call "R" is just small all over and rather short legged. His chest measures 56cm. My niece "K" is very thin and only slightly shorter than her classmates. Her chest measurement is only 54cm. As you can see, compared to the chart neither of them come close to what Lutterloh thinks a 5 year old should measure. I typically choose Lutterloh patterns in the 2-6 year range for them. According to the chart K doesn't yet fit into the 2-6 range but I know she has a vastly different shape from a 1 year old baby. Choosing patterns for a baby for her would result in garments that were way too short all over. Babies tend to have shorter, plumper limbs than older toddlers so I at least need to stick with a toddler size range.
You'll see from the 1976 photo above that Lutterloh generally tends to categorize their patterns in ranges that cover about 4 years with some overlapping going on. If you had a rather "large for their age" 4 year old you might very well be able to use all the patterns on this one page. I have found that for K I can now use patterns in the 2-6 up to the 4-8 range. Because I use her chest measurement my patterns fit great in all the circumference areas but because this measurement is so small I then need to lengthen them all. The smaller range patterns I usually only need to lengthen a couple of inches but I recently drew out top and pants patterns in the 4-8 range that I needed to lengthen by more than 5 inches.
So, when deciding what size range to use for your child, you need to consider their stature as well as their measurements. Ask yourself is my child average sized compared to other children their age? For very petite children you may need to use a smaller size range than their age. For the bigger, fast growing children you may need to use patterns intended for slightly older children. Just remember to always at least paper fit your pattern before cutting out your fashion fabric. This should give you an idea if you need to make any length or ease adjustments before any fabric is wasted. If your child is far from average it might be a good idea to make a test garment in an inexpensive fabric first. This will help you determine the adjustments you need to make to all the child's patterns in this range. At least until they grow again. :)
http://sewingnhumming.blogspot.com/2010/03/more-manipulating-of-lutterloh-patterns.html
for more info on the patterns Ann will be using for K's gift.
Sunday, March 7, 2010
From the orginal Blog I deleted
Tuesday, April 14, 2009
What to do if the size is a small child
I have many old Lutterloh books from all over the world. The fashions are breath taking, the history is loud and clear. There is a new baby in our family, a grand daughter and her mom wanted a special dress for her church ceremony. I took out my books and found this sweet little dress. The book it is in came from Brazil so I can't read the pre-directions in the front. he he!
#107
The only problem I found is Penny is only a tiny thing and she measures 46 on the Lutterloh ruler. If you look you will see there isn't a 46, the smallest it goes is to 50. If I use 50 that will make this dress TOO BIG. You may run into this one day and so here is what I did.
1) Put the holding pin in the bottom most hole and put it through the X in your pattern
I used pattern #107 below. Lets make the skirt
2) Make a second ruler top by printing a copy of yours on card stock.
You will use this to remove the extra.
3) Do a little math on the newly printed ruler. Penny's pattern will be too large by three spaces 46 to 50 on the ruler count to the 4Th line to get the three spaces. A sticky page marker put on the spot helps. Or just work from a number close to yours I used 66 and put a marker and went to 60 on the card stock tape top.
4) I put my pin in at 50 and Penny needs her pattern made at 46. The first number on the skirt pattern is #23 at the top waist. I pull my tape out and find #23 on my original tape then I lay my printed card stock tape top on the #23 line and measure off my three spaces. I made my mark there. Don't be tempted to just add on the original tape measure because it won't be correct. It is slightly different. Be sure you put your Dot on the correct side of the tape, the side that lines up with the Number #23 line at the pattern.
We are subtracting the three spaces for the correct size.
I have two tapes the green shows the 23 the pattern showed the orange tapes show the amount I must remove. Yes remove. so I put my dot at the top orange mark, 3 spaces above the bottom orange tape.
Once you do the math this goes just as fast as any pattern would and I got a perfect size pattern. I always lay the pieces out and measure to be sure I have the kind of ease I would want in a pattern.
Penny is a baby and everyone will be picking her up and down so I wanted to be sure there was room for her comfort. She measures 17" in her chest and the pattern made 22". That is 5 inches of ease and that will be plenty and work with that full skirt.
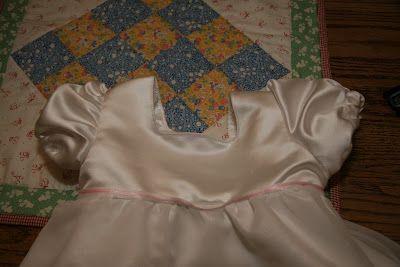
This is the finished dress. My daughter in law wanted the dress shorter, only to the babies feet and she had the idea for adding the ribbon. I can't wait to show her my Lutterloh baby dress! I think I would have removed an inch of the ease now that I see it on her but I was far away when I made this dress and could only guess by using the measurements.