Friday, January 22, 2010

Thursday, January 21, 2010
Sunday, January 10, 2010
The Lutterloh System Symbols Page - An Evolution
Fonnell's recent post on facings got me thinking how some people might be confused by the symbols on their Lutterloh patterns. After all, the symbols page has changed a few times over the years. For the most recent Lutterloh symbols chart see this post here.
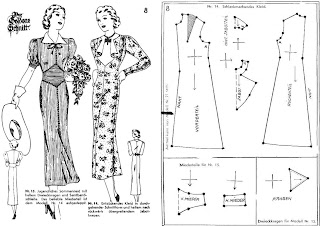 Pattern #8 from 1939
 Lutterloh symbols page 1950
 Pattern #79 - 1969
 1980 and 1989 Symbols Pages
With all the letters for sewing sequence and pattern pieces printed amongst the cutting, folding, gathering and waist markings the patterns started looking pretty busy.
1980 and 1989 Symbols Pages
With all the letters for sewing sequence and pattern pieces printed amongst the cutting, folding, gathering and waist markings the patterns started looking pretty busy.
 Pattern # 279/280 - 1991
 Pattern #8 from 1939
It's apparent that in years past more decisions were left up to the seamstress, from facings to sewing order, even closures.
 Lutterloh symbols page 1950
The photo above is the earliest version of the Lutterloh symbols page that I've found in English. As you can see it's a rather scaled down version of the one that comes with today's Lutterloh patterns. A Key to Signs Used is at the bottom of "Important Rules on Pattern Cutting".
 Page from a Lutterloh Home Study Course Manual
 1968 Symbols page
 Page from a Lutterloh Home Study Course Manual
 1968 Symbols page
Later, more symbols were added to include explanations for things like pocket flaps and elastic. Notice that originally those hatch lines were used to indicate any double layer of fabric. This explains the hatch lines on areas such as darts, pleats and bindings as seen in the photo below.
 Pattern #79 - 1969
Still later, more renditions of the symbols page were published. Around the 1980's the symbols for full figure, knits, maternity and contrast color were introduced. Finally the symbol for a zipper was noted and the wavy symbol for ease was changed to denote gathering. In addition more symbols were included for fold lines, closures and fabric requirements.
 1980 and 1989 Symbols Pages
 Pattern # 279/280 - 1991
The photo below is the 2006 version of the Lutterloh Symbols Page. The newest additions are symbols for top stitching and a 90 degree angle.

2006 Symbols Page
This same angle symbol is sometimes used with the number 45 indicating the fabric should be cut on the bias.

Pattern# 45/46 - 2008

Pattern# 45/46 - 2008
You may be wondering why all these changes are relevant today. I personally find all these letters and various dashed lines and symbols squashed into the space of these miniature patterns sometimes confusing. Hey sometimes there's even a symbol missing or mis marked on occasion. No company is beyond an accidental typographical error. So how are we supposed to decipher all these symbols and lines?
For me, this simply underscores the need to rely on good, basic sewing skills to guide me through. If I decide on a technique that I'm not familiar with I always have a few comprehensive sewing books on hand. As a last resort I can always do an internet search and usually turn up at least a couple links to explain the procedure. It's amazing what you can find by just typing in a simple phrase.
I hope I haven't confused anyone with the presentation of all these different charts. My goal was really to encourage everyone's creative process. Certainly a sewing pattern needs to produce a garment that fits but we ultimately decide on the details. I urge you to interpret the Lutterloh patterns to suit your sewing style! If you are pleased with the final outcome then you must be doing it right!
For me, this simply underscores the need to rely on good, basic sewing skills to guide me through. If I decide on a technique that I'm not familiar with I always have a few comprehensive sewing books on hand. As a last resort I can always do an internet search and usually turn up at least a couple links to explain the procedure. It's amazing what you can find by just typing in a simple phrase.
I hope I haven't confused anyone with the presentation of all these different charts. My goal was really to encourage everyone's creative process. Certainly a sewing pattern needs to produce a garment that fits but we ultimately decide on the details. I urge you to interpret the Lutterloh patterns to suit your sewing style! If you are pleased with the final outcome then you must be doing it right!
Friday, January 8, 2010
A quick note for new visitors to the blog
I've been hearing some chatter online about vintage and resizing them.
How I love the vintage patterns. You can look though the blog and see some that we have worked with. What is different between the obvious style changes?
EASE.
Yes there is a whole posting on ease and that is what is the biggest difference.
We have a lot more ease in our clothes now. This ease issue is clearly seen in the way sleeves are done in vintage. Shallow armscye, high caps and yet I like them when relaxed a bit.
I look much better in these sleeves.
You make vintage just like you make today's' lutterloh. Use your correct number on the measuring tape. Make the pattern. You then paper fit and decide what style changes you need and how much ease is needed for you.
You make vintage just like you make today's' lutterloh. Use your correct number on the measuring tape. Make the pattern. You then paper fit and decide what style changes you need and how much ease is needed for you.
See Ann's dress updated from vintage.
http://sewingnhumming.blogspot.com/2009/10/fresh-look-at-vintage.html
http://sewingnhumming.blogspot.com/2009/10/fresh-look-at-vintage.html
Once you understand how Lutterloh patterns are made you will see your tape measure has the power to make any Lutterloh pattern fit you!
Lutterloh designed their fashions on the golden rule. That means the original of the pattern was sized in the balances of the body. You can study more about this system online. I learned it as an art major. The perfect balance found in the human form. Next when you put find your number on the tape measure and pin it in the middle of the cross of your pattern you are taking that Golden rule pattern and making a graded pattern.
A pattern that goes in increments to create a larger or smaller size.

One pattern (pj top) any size
128 on the tape
84 on the tape
56 on the tape
Pj's for the whole family from one pattern graded
Because of this you can grade any Lutterloh pattern, any time period to your size.
Just plan to update any older styles you don't want to wear on stage!
Do you want more on this subject?
Let us know.....
http://sewingnhumming.blogspot.com/2009/07/i-had-to-prove-this-to-myself-can-scan.html
If you want to see what scanning at different sizes does check the posting above.
There is a list of subjects we have covered over on the right, just click on it and you will see the article. All our pictures will enlarge by clicking on them so you never have to miss out on what is on the pattern.
Welcome
Thursday, December 31, 2009
how to FACE the facings
HAPPY 2010!
With this new year we will be encouraging you to study your pattern books to answer most questions.
One of those things that just isn't clear is FACINGS.
Each pattern, each book, each era seems to present new facing issues. I hope to make some of it clear here and welcome your input as all I can do is make an educated guess at what the pattern is telling us.
When I learned to sew (I'm giving away a lot here) in the 50's we depended on knowledge of methods and not pattern instructions to make our clothing. I started with the Bishop method of working on grain and very few patterns were needed. As we passed into the 60's & 70's patterns were amazing and fun and had step by step instructions that trained us. Yes those step by step methods taught us not to think.
With this new year we will be encouraging you to study your pattern books to answer most questions.
One of those things that just isn't clear is FACINGS.
Each pattern, each book, each era seems to present new facing issues. I hope to make some of it clear here and welcome your input as all I can do is make an educated guess at what the pattern is telling us.
When I learned to sew (I'm giving away a lot here) in the 50's we depended on knowledge of methods and not pattern instructions to make our clothing. I started with the Bishop method of working on grain and very few patterns were needed. As we passed into the 60's & 70's patterns were amazing and fun and had step by step instructions that trained us. Yes those step by step methods taught us not to think.
We dumbed down!
We lost the ability to decide for ourselves how we would like the clothing to be made.
I challenge you to get a good basic sewing book and decide for yourself how to do each step of your pattern. There are so many ways to do each part that no one way is clearly perfect in all cases. If you like how it turns out then it was a good method to have used.
I challenge you to get a good basic sewing book and decide for yourself how to do each step of your pattern. There are so many ways to do each part that no one way is clearly perfect in all cases. If you like how it turns out then it was a good method to have used.
**********************************************
FACINGS

The symbols are many for decoding the Lutterloh patterns. These you will see intermixed with the facing symbol. Facings are noted as diagonal hatching and ST, the S notes a trimming. These two can be confused or even used interchangeably
Any garment can be lined this is not noted in Lutterloh patterns.
Interfacing is a choice and is used in collars, button bands, waist bands, cuffs, etc. You will decide when to use these they are not noted.
Look at these pattern pieces and see how to find the facings and use the facings.
 The dotted lines between symbols are fold lines, first you see a self facing (hatching) It folds over the elastic (see symbol for elastic above)
 The thing you shouldn't forget before folding this down is that seam allowances and hems are not in the pattern so I would add a 1/2" to the top for the clean finish.
But add what you wish to use
 The facing on this pair of pants needs to have a separate piece traced and cut out. One thing you can see that helps tell you this is that the zipper marks go all the way to the top of the pant. That tells you the facing might be separate. You need to add seam allowance and a fold over for the hem. You must also add the seam allowance to the pant top. It's funny to see hatch marks in the dart but if you think about it a dart really is faced when you pinch the fabric in half.
 This facing is fun. See the button line? On the left of it is the button space so we know that the hatching on the other side is a fold over facing and you do not need to cut a separate piece.

I know that seeing the fashion model helps me figure out the intent of the pattern but really I decide the intent of the fashion so I am having you look at the patterns without the aid of the fashion drawings.
Here we have several separate facings.
How do we know? That circle half dark half light is for contrasting fabric. You must add seam allowances.
You also have two arrows used to show different pieces on the front edge so you draw the pattern then cut the front in two separate pieces. In the fashion picture the front piece is cut in the fashion fabric not the contrast. I'm not sure why there is a separate piece if it isn't in the contrast. Odd shape for a button band. It looks as if the button band is a self facing one that you just fold over but do add some hem turning space.
I have several ways to do the contrast fabric. If the top and sleeves are the length I want I will sew the contrasting fabric wrong side to wrong side and fold it toward the front of the fabric. This will make it easy to keep the 3 cm width at the bottom of outfit. It uses mostly the main fabric as the back of the contrasting area. If you wish to sew it to the bottom right sides together and fold it to the underside you need to double the size and add that hem fold over. Other wise the contrast will barely show. Luttlerloh vintage has a lot of contrasting features. This is something we can cover in another posting.
 Here the facings are separate and need to be cut separate on the back neck and on the front button band and collar. Add seam allowance and hem finishing length. The bottom appears to be a folded hem but we don't see other hems marked in this way so it may be a facing. We do know it is 3 cm wide.
 This is a front pant zipper the hatching is a fold over facing but there is a separate zipper piece 4 cm by 16 Cm that also has a fold over facing. The waist band is separate and the other hatching may be just a folded area. Easy this time.
The pocket needs several pieces. I make these pockets all the time and we call each piece something different to keep track. The hatching is a separate facing piece cut in that shape shown using the pocket lining piece as the mold. I have fun with this and use fun fabrics for this facing.
The front zipper is a center matched zipper and you fold back a self facing on both sides and put the zipper uncovered into the pant. Feel free to cover it by making another piece as in the pant pattern above.
 This is a fun sleeve bottom. For this I'll show the fashion picture. See the line of double stitching? Those are the two lines very close and parallel. The other line that is farther apart is believed to be a fold line. This makes me think this is a mock cuff. Find out how to make one in a good sewing book.
On the right coat a possible mock cuff on the left a self facing folded up cuff
 Figuring out this facing means when you fold up the cuff you have the wrong side of the fabric showing. See photo above. Think this through carefully. How do you make a nice looking cuff?
A knit bathing suit with elastic and self facing. No raveling with bathing suit knit so I don't add a folded hem I just sew it down.
 Separate facing. Many times you can connect or enlarge facings to include button bands, back facing or even bodice lining. The size of facings is a suggestion.
OK your turn.... what facings do you need and what kind are they?
THE QUESTION: Are hatch lines only facings when the ST is on them? Are they just turned areas if not marked? Are the dashed lines folds for darts, tucks, as in placing a front center on the fold? Or is it used for any folded fabric meaning that when present we don't need to make separate facings? Which dashed lines are top stitching, which are folds, which hems?
So many questions! Let's find the answers shall we?
Saturday, December 26, 2009
sleeves the lutterloh way
I hope everyone has enjoyed their holidays'. I know how bad the weather was in many places but that just makes us get into our sewing more. A good question was asked on doing the Lutterloh sleeves. Here I am showing you the method shown in the books. In the next post I will show you some additional helps.

In the pattern for a two piece sleeve you see the cross for putting your pin in. You will make both pieces putting your pin in the one cross but you will cut the pieces out.
CAUTION
Before cutting pieces apart....
Draw a horizontal line across the pin hole making sure it cross the two pattern pieces. This mark will be your matching mark for putting the two pieces together. The distance you see from that point to the wrist is a type of dart. When you put the sleeve together that will pull the sleeve in and may need a touch of easing to get it together.
Next we need to find the center of the sleeve top. I have left the drafting number above the sleeve center. When you draft this number be sure to put a center line into the pattern. You may not see a center line in the vintage sleeve so my next posting will be helpful for those patterns.
One thing about the Lutterloh sleeve that really works for me is the front fitting of the sleeve. (see example below of shape of sleeves) It follows my shoulder and makes the sleeve look great on my slanted shoulder. Patterns you buy at a store today create the sleeve to be nearly equal on both the front of center and the back of center. Yes that makes the pattern fit anyone but not usually with much style. Because of the fitting of the front of the Lutterloh sleeve you will need to fit the center to center line and fit the ease into the back as needed.
See instructions from the 2000 pattern book for sleeve fitting below.

See how fast the slop of the front drops?
And how gradual and long the back drops?
makes a better fitting but more challenging to fit sleeve.

you can click on this to enlarge it but most likely it is in your pattern book already.
Tuesday, November 10, 2009
Holiday Dazzle Sewcial

I'm starting to receive holiday invitations and thinking
"What will I wear?"
Join us in a Holiday Sewcial
Look at your pattern book and see what you can turn
into a holiday outfit, a holiday gift, or just some fun sewing!
It's amazing what can happen to a blouse pattern if.....
I use dupioni silk or sparkle buttons, maybe velvet piping
I can add fancy embellishment and my pattern will cry out "Happy Holiday"
Or maybe it's Pj's or a robe you want!
In the spirit of a No Stress Holiday
there is no need to sign up for
this sewcial and no deadlines.
Share your ideas, photos and struggles if any.
Put some Dazzle in your closet!
It's a HOLIDAY SEWCIAL
Start now
Our fashion beauties came from a Dec 1933 French fashion magazine I own
*********************************************************************
Pam is getting started with a plan!
Well here is my plan for the Holiday Sewcial. Forget about the dress, I’ve changed my mind (I am a woman, right?) Picture this.........beautiful soft flowing peasant blouse made in an embroidered metallic cotton, white & gold,
teamed with a pair of white pants, slim legs, made in textured stretch cotton.
Just ordered my fabric online so back to the quilt while I await its arrival.
Regards
Pam from South Australia
Regards
Pam from South Australia


The top is #117 from the current book and the pants are from Supplement 257, #31.
Ann managed to get some gift sewing done the week before Christmas

My friend says she's lazy about putting on sunscreen so she requested a rash guard. I just used a raglan sleeve turtleneck pattern and shortened the sleeves.

I always make flannel pajamas for her son for Christmas too!

I used the same pajama pattern for my niece and girled it up with some lace. Because I used a rather boyish print I wanted to change the shape of the top to make it more girly. I used the exact same pattern but folded it at about mid armhole level. I added 1/2 inch seam allowances and cut separate top and bottom bodice pieces giving me a yoke and a skirt piece. To add more fabric for gathering the lower bodice I didn't lay that pattern piece on the fold. Instead I moved it away about 4 inches giving me plenty of extra "ease" to gather onto the top bodice. My niece loved her new jammies and had not a word to say about the boyish print. Guess I can still get away with this with a five year old ;)
Sunday, November 8, 2009
The many possibilities! let's make a slip
Chart for how I work on patterns
(Please note any fitting issues from your vest before beginning.
Make the needed adjustment to patterns you will use to make slips etc.
before beginning the below process.)
WANT MORE
than just the fashions in your Lutterloh book?Ann and I have been showing you how to change the fashions to fit your needs. Many of you have said you need slips, aprons, sleepwear & bras and those patterns aren't in your books.
Let me show you how to make a full slip from a sheath dress.
If you want to see an apron made from the sheath dress check out the Apron Sewcial photos!
http://sewingnhumming.blogspot.com/2009/10/vintage-apron-sewcial.html
First choose a pattern that is close fitting with simple lines
You've seen this one before. Each book has at least one.

Here is the pattern I am going to use.
A sheath dress

This dress is perfect for a fitted slip.
It has the traditional 2 darts in front one dart in back.
It takes a couple of steps but do a mini practice run on a scanned and printed copy and you will see how very easy this slip pattern is to make.
Also once you make the changes to the bottom bodice
you can put it back together into a sun dress for summer!
********************************************************
Before we start making our slip here is how I think of my patterns.
Looking at the drawing at the top of this posting you will see my model broken into seven work spaces. I can cut my pattern at these points and make changes and then reattach to the whole.
Let me explain each space
space#1 This is the shoulder, armscye and chest area. Garments hang from this area.
I like it to fit it perfectly so it deserves careful fitting.If we need to be smaller in this area yet are busty Ann suggested you take your measurement under the arm and over the chest in this area. You may move darts to the shoulder here, or add a bit of gathering at the bottom of this area. You will embellish here but mostly you work on fit in this space.
space#2 This is the area I make bust changes in. Darts move within the dart circle in this area. The slip will be designed using space #2 & #3.
space#3 THIS is a GREAT area for design ease. You can play in this area, do you like fitted or free and flowing. Do all that right here. You can widen it and gather it against space #2. You can make it as long or as short as you wish. This is have fun and design space.
space #4 This is our hip area and it requires some careful fit. It is one of the easiest places to get a correct fit. This does include the crotch which drives many people crazy. Once this space is fitted you have skirts and pants galore you can design.
space #5 Another careful fitted area. The armscye and shoulder and upper arm. If this fits then you can have any kind of sleeve beyond this area.
space #6 & #7 Design areas. Any kind of pants any kind of sleeve can be added to this line.
************************************************************************
Lets have some fun cutting our pattern

Find the waist line markings and cut the bodice off of the skirt at that line
#1 We will first work on the bodice to make it tighter and lower.
The goal is to make sure the slip is well hidden under your outfit and not so loose as to cause bubbles under your clothes.
#2 The next line will be made at the bottom of the armscye. You will be removing Space #1 and working on space #2 & #3. You can choose how high or low you want your slip by where you decide to put and cut this line. This line can start at the underarm and angle up to where it will be in the middle of the chest.
 Decide how low you want your slip or sundress to be. Lay the paper pattern up to yourself and see where your bust circle goes. You will need to put the line higher than the bust circle. I have marked my cutting line in red.
Doesn't look like much now but it's soon to be a top of a slip

You could sew straps on this, connect it back to the skirt and have a slip
but it would be much nicer if we did some fitting so that the top line is snug.
How to do a fitted slip bodice.
Try to hold the paper pattern up to yourself (I use re-stick able scotch tape to put back and front together) and pinch to see how much you need to tighten things up.
You just might find this impossible. Often you need to get some scrap fabric and sew the front and back together ,sew the dart and pinch at each side right at the side of your body. Pin the pinched amount closed and measure to see how much fabric we need to remove to tighten up the top. You can do a good guess at how tight you'd like this and process with a test run.
A pinch is two sides so measure one side but do remember it is double that amount.
Lets say when you pinch you find you need to remove 2" on each side. (a one inch pinch)
That is 1" for the 1/2 front pattern and 1" for the 1/2 of the back pattern.
Really a total in the bodice of 4 inches
#3 It's easy to remove the 1" from the back piece (we are only working with half a pattern)
We remove the ease in both the dart and the side
Cut up though the dart until you have two pieces
I cut the dart out in the picture below. 
tape the top back together
by over lapping 1/4" at the top swinging to leave the dart open but not as big as before
and then remove another 1/4" to 1/2" inch on the top side tapering to nothing at the waist.
The red areas are where the back was made smaller

Do the same thing to the front as so..............

Remove darts, cut straight up from waist line up through to top of bodice.
Make a 2nd cut from side across the level part of the dart and to the first cut
We have three pieces now. We will be keeping both darts but they will be shorter
 Tape the front back together over lapping the top seams by 1/4" and removing 1/4" to 1/2" off the side. You still need the darts for the fitted slip but they will be a bit shorter.
You can trace this on paper and do a paper fitting, my first choice or test on fabric.
Once it feels like you like it to fit.............continue to..................
Add bodice bottom back into the skirt.
Put the bodice back on the skirt. Decide if the skirt shape meets your shaping needs. Shorten the skirt of the dress (I never want any of my slip to show unless I made it to do so!)
If your skirt is tight add a side or back opening for leg movement.
Add straps just above the bust point and over the shoulder to the back.
It looks a bit odd but once the darts are closed it's a fitted slip!

Now for some Optional slips ideas

I cut a bra shape in the top of this slip, it would be pretty in lace.
I shortened the slip by a lot and gave it a little bottom flare for a cut princess dress that so many of the kids are wearing.
You can cut your top line on the bra shape any way you want just center it over the bust point.
Lay a paper pattern over yourself and draw in a slip shape you like in the chest area.
************************************
Below are some examples from a 1940's sewing book. It is out of print and all it teaches you is how to hand sew these items.
However there is so much to learn from looking at these finished slips and reading the descriptions, it will also give you ideas on shaping that front bodice piece.


Not Lutterloh patterns
Friday, November 6, 2009
My favorite tools for making seam allowance
 My metal marking ruler and my tailors chalk for marking seam allowances
There are different ways to mark your seam allowances on a lutterloh pattern
but this is my favorite.
It's a tiny metal do it all ruler
It has 2 inches at it's largest and goes through 1 inch, 1 3/4", 1 5/8", 1 1/2", 1 3/8", 1 1/4"
Then on to 1/2", 3/8", 5/8", 3/4", 1/4" and finally 1/8"
Now isn't that amazing? All in one little spot.
This way I can mark any size seam I want in any place I want.
 I move my slot for 5/8" seam allowance along the edge of the paper pattern
As I go I put a tiny dash of the chalk
This will not be within the finished garment area, mostly I end up cutting right though it

You can see the little dashes along the silk
When I am all finished marking all the edges of the pattern I cut using the dashes as my cutting line. I'm careful to cut smoothly and to remember to mark the sizes for hems and folded in button bands etc.
Normally I would use 1/2 seam allowances but I am using a Hong Kong finish on the seams of this light jacket and I need the extra to work with the edges. I cut the neck edges 1/2" as they will have a Mandarin collar and 1/2" is all I need.
I wouldn't be without this favorite tool!
Subscribe to:
Posts (Atom)