
Without sewing instructions you may feel lost. If you learn as much as you can about the Lutterloh symbols you will find sewing your projects together much easier. Today we will look for pleats and gathers. You can open your pattern books and find some of these same examples. It helps to get to know all the different ways a symbol is used. I've stayed with the 1970's and 1980's as before that point there were some very different ways to sew.
1) I study the Pattern picture I will be using. If you look above you will see some places that gathering and pleats might be used. Then I look at the pattern to see what Lutterloh intended for the things I saw on the picture fashions.
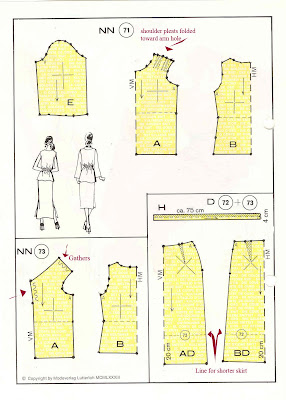
There are some directional pleats on the shoulder. See the lines they point toward the arm hole. That's easy. In the fashion picture it looks as if some trim was used or that the area was roached.
You will also see the snake like line of the gather in two places on the front of the top. This can also mean you are easing two fabrics together to fit or it can mean you gather and sew to another part of the pattern.

 In this summery outfit we see may not see any gathers or pleats, but look closely at the sleeve

In checking the pattern above you will see a pleat on the sleeve. Those lines we have thought of as facing can also ask us to fold, a sort of self facing. The lines show us to fold toward the center line. My concern is how much am I folding in this pleat? Usually there is a cm marking but not on this sleeve. We do know the cuff is 37 cm long and so the sleeve needs to match that on the bottom edge.
I will still need to do some testing to be sure the pleat takes enough out of the sleeve that it will fit into the armscye correctly. I will walk the paper sleeve I made into the bodice pieces.

In the fashion drawing of the sleeve we see that a seam and an arrow has been sewn down the center for a few inches to hold the pleat. Your pattern doesn't tell you any of this so you are going to work from the picture. I find I work from the fashion picture a lot of the time. It was what caught my eye in the first place. If I want my outfit to look like the picture I need to match the fashion bit's and pieces.


See if you can find the elastic in this pattern also, it gathers in the sleeve.

 We have a lot we can look at in this pattern. Notice the child's skirt. You will make two pieces out of the one cross, A and Ac/Bc. There is a dashed line on ac/bc which means it goes on a fold. How do you know to make two pattern pieces. See the two arrows pointing down the dress? One arrow for each pattern piece. Even though you may draft it at the same time you cut it add seams and hems and sew it back together. Next you will see the top is gathered for sewing to the bodice on the childs dress.
 Now look at the sleeve, gathered at the top and elastic near the bottom it tell us 4 cm from the bottom I put .5 cm elastic. It doesn't tell you how to put that elastic in but you do have choices. Bias tape channel, zip zag a channel if you don't mind the thread showing or make the bottom longer and fold it up to make a channel and a hem. That's all up to you. There is no right or wrong way. There is only working to get the outfit you'd love to wear!
You will also see a couple of ruffles to gather and the mom's skirt is also cut into several pieces even though you draft it as one, and it is put on the fold.
These are great patterns for study.
Find some others and do ask questions when you see a symbol use that is not familiar.
Next time we will cover another symbol you might not have seen often.
For the most recent Lutterloh symbols chart see this post here.
Thanks for all this excellent information. Great blog!
ReplyDeleteLaura
i like this info but still not clear how to form the collar and the pocket on the pattern, how do i form those two patterns
ReplyDeleteI can see why this making collars and pockets would puzzle someone.
ReplyDeleteThere is a cross or X somewhere near each piece. You use that cross or X put your tape measure at your bust measurement and draw as you would your bodice etc.
If there are measurements by a pattern piece you just cut the pocket or waist band to those measurements. They are in metrics and there are many online locations to sort that out on. Don't forget everything needs a seam allowance, even a pocket.
Happy pattern making!
Why is it sometimes a cross and sometimes an X? What is that telling me?
Delete